home tutorials recipes aprons/patterns Soaps

Thursday, October 28, 2010

Cherry "Cinnamon" Rolls

My fall sewing has ended and my Christmas sewing is just beginning..... But for right now I am free to blog a few tasty things. This is a recipe I experimented with for my friend Tracy. Every now and then we have to have a bun (cinnamon roll) and a cup of tea (rooibos tea), and de-stress and the regroup. I need it as much as she does. (I hope she needs it as bad as I do).
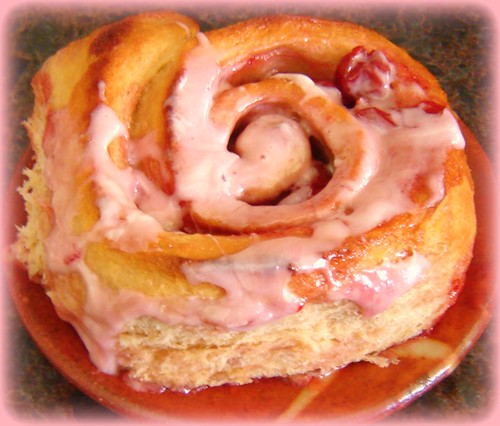
I wanted to try something different the other day and I had seen a Cherry roll at a local tea shop and had to give it a try. I used my regular cinnamon roll dough recipe (whole wheat) and added my own home canned cherry pie filling (recipe to come). It was fabulous! So here is what I did.
Cherry Rolls 002
Cherry Rolls

Dough:
2 Tbsp dry yeast
6 Cup whole wheat flour
2 Tbsp Gluten
2 tsp salt
6 Tbsp (non-instant) dry milk (1 cup instant)
1/2 cup instant potato flakes
2 Tbsp lecithin (optional)
2 cups hot water
1/3 cup honey
1/2 cup butter
2 tbsp lemon juice
2 eggs

Dissolve the yeast in the water. Add the honey, eggs, milk, salt, lemon juice, butter, potato flakes, and lecithin and 1/2 the flour. (mix the gluten with the flour or it will clump). Beat well and let rise. Add the remaining flour and kneed for 8-10 minutes. Let rise for 1 hour.

Filling:
1/3 cup honey
1/4 cup butter
1 can cherry pie filling

Mix honey and butter together.

Roll out the dough into a large rectangle. Spread with honey and butter mixture. Top this with cherry pie filling.
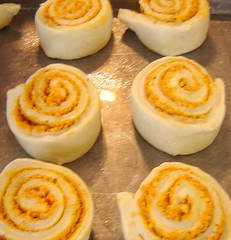
Roll into a "classic cinnamon roll". Cut with dental floss or a heavy thread. Makes 12 very large or 24 small cinnamon rolls. Place on a buttered pan or cookie sheet, cover and let rise for 20 minutes.
Bake at 375 deg F for 18-20 minutes.

Frosting
1/4 cup butter
4 oz cream cheese
2 cups (maybe a bit more) Powdered sugar
vanilla extract
Milk if needed

Mix the butter and cheese together. Add the sugar and vanilla. Whip into frosting. Add more sugar or milk if needed.
Frost the rolls when the come out of the oven, this melts the frosting all over the place and it is gooey, sweet and warm.
Heaven!

Tips and Tricks I have learned:
*non-instant powdered milk is tricky to work with. If you don't mix it in just right, it clumps. I have found that you either need to whisk it in carefully (not something I ever remember) OR mix it with your flour. This spreads it out and there is no clumping. The same goes for the gluten. It clumps something terrible, however, mixed with the flour there is no problem.
*Oven proofing - I have found that if I "proof" or raise my cut rolls in the oven, they get much bigger and fluffier. This is quite an accomplishment with 100% whole wheat. What I do is heat the oven to 200 deg. F and then TURN IT OFF. While that is heating, I boil a kettle of water. When the rolls are cut and in the pan, I our the boiling water into a baking dish in the oven and slip my rolls right in there. I let that set for 20 minutes. I remove the rolls and the water, heat the oven to temperature and bake as usually. The buns get really big. Because of this, I space them well on the pan so they are NOT touching when I put them in, they will be when I pull them out to bake.
Cherry Rolls 001
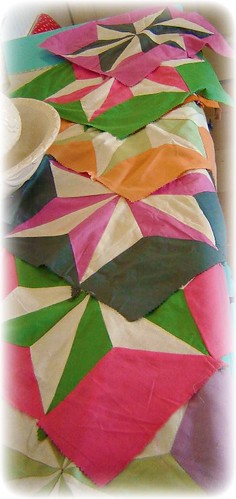
These rolls are "proofed" and ready to bake.

Wednesday, October 27, 2010

Happy Halloween

Byrdies
This year we have:
Sushi, Sally (nightmare before Christmas), The cleverest Witch, A princess, and Toothless
We had fun, nearly sewed my fingers together. It is so worth it to see them have so much fun designing them.

Monday, October 25, 2010

Yarn Dyetorial

Yarn Dye 009
Isn't that lovely?!
Step two of my Yarn Experiments was to dye the yarn.
So...... Here is a quick tute of what I did for this project.
1.
Tie Dye Totorial - Yarn Dying 003
First I put the yarn into hanks of about 2 oz each (weight).
Then I got them wet with water and squeezed as much out as I could.
2.
Yarn Dye 001
Then I mixed up my dye concentrates (remember I told you how to do this HERE.)
After I mixed the concentrates. I mixed them to the desired colors (just had fun really mixing). I mixed enough to make 1/2 cup of the mixtures. Then I added enough water to that to make 1 cup.
3.
Yarn Dye 006
Then I poured the mixed and diluted dye over the wet hanks of yarn. I put two together at a time so I would have about 4 oz of each color I mixed.
Let that sit for 15-20 minutes.
Then Add 1 cup of prepared Soda Ash Solution (instructions found HERE).
Let this sit for 1 hour to over night.
Then rinse in running water until the water squeezed from the yarn runs clear.
Yarn Dye 013
Line dry for several hours. I did bring some in because it was starting to rain (fall in Missouri is mostly rain or the threat thereof.) I put it in the dryer on "delicate" setting and it dried all right. It got a bit fluffy but that made it feel so soft and wonderful.
Yarn Dye 010
Now to do my project with it!

Tuesday, October 12, 2010

New Projects

With Fall and Winter coming now I am in the mood to start a new project. Not some "I'll be done in ten minutes" kind of project but one that will take me weeks and maybe months. I am pretty excited about this one. Maybe I will even post a tutorial or two along the way and it progresses.
At any rate, I am going to enjoy this and by blogging it, MAYBE, I will be able to keep the ADD factors in check and actually finish it. We will see.
Here is the first picture.


Tie Dye Totorial - Yarn Dying 003


It actually took me all day to put this yarn into hanks. Horrors. I had no idea how long it would take or that it would make the muscles in my arm pit hurt either. :o) Now I have 3 or so shopping bags full of these loopy hanks of yarn, ready for step 2.

Dyetorial - Basic Scrunched Folds

Yay for blogging one a month. I am sorry. I meant to get these out a lot sooner but Fall is turning out to be just as busy if not more so than summer was.
At any rate, here is your first "Hands On" Tie Dye tutorial.
The Quicky Basic Scrunch Fold
scrunch fold 007
This is the fastest and easiest way to "tie dye" a shirt or piece of fabric.
Instructions:
1. Start with a 100% cotton shirt of your choice.
Wash it with sinthrapol (just a cap full) to get any residue off your fabric. I do this with everything I am going to dye to make sure there is NOTHING on the surface of the fabric that will inter fear with the dying process.
Do not dry the shirt, leave in damp.
Plain T Shirt
2. Lay the shirt out flat on a clean work surface.
Scrunch Pleats 1
3. Starting along the bottom edge of the shirt, walk your fingers up the shirt, scrunching it together into random pleats as you go up the shirt.
Scrunch Pleats 2
4. Tie the shirt together. You may also use rubber bands or small zip ties if you like. You just want to tightly secure the shirt in its random pleats and folds.
Scrunch Pleats 3
5. Soak the Shirt in your soda ash solution for about 5 minutes. Squeeze as much of the solution out as you can.
Add Color
6. Place the shirt back on your clean and now plastic covered surface. Apply the dye colors of your choice in what ever order you choose to BOTH sides of your shirt lump.
Be as bold or concervative as you wish with your color combinations. The shirt will look like a real mess. That is the point. Don't be shy about squirting that dye in there. If you don't, you will have lots of white showing in the shrits.
Scrunch pleats 5
Remember that with tie dye, you get what you get. It is always a suprise.
Scrunch Pleats 4
7. Put the drippy dyed shirt bundle in a plastic bag and let it sit for up to 24 hours. I have found that you need to let it set for a minimum of 3 hours. So experiment and see what you like. 24 hours is a safe starting point.
8. Now you will rinse the shirt bundle out in cool running water. This is safe to do outdoors but the dye will stain anything it comes in contact with. It will eventially face so don't worry about permanent dammage to sidewalks and such.
9. Cut the strings and open. Now you will need to wash the shrit with Sinthrapol again to make sure all the excess dye is discharged from the shirt. I wash these in the washing machine with 2-4 Tablespoons of Sythrapol per load.
Dry on the line or in the dryer.
In future washings, take care what you wash the dyed items with. Some excess dye (usually blue and sometimes red) will still discharge for several washings.
I have also used DAWN dish soap in place of the synthrapol with satisfactory results.
scrunch fold 011
Here is the same process with just fabric yardage.
You can use just about any 100% cotton BUT watch out for antying that has permanent press treatments on it, as this will not hold the dye well and will result in pastel colors. This is great if that is what you are going for, however it is a big dissapointment if you were going for Bright vibrant colors.
So there you have it. Your first REAL dyetorial. There are several more folding and dying techniques to come and hopefully I will have the time to post them all over the next few weeks.
Enjoy!

Thursday, September 09, 2010

Dyetorial - Dye Solutions

Now that you have your list of "Ingredients" you need to dye fabric, I need to give you the recipes. I am putting them here so you can have a quick reference and I won't have to list them over and over and over ..... again. :o)

First off I am listing the recommended reading.

Color by Accident: Low-Water Immersion Dyeing by Ann Johnston

This book has taught me a lot about how dye moves through fabric and has helped me develop my own recipes for dye. There are many other dye books out here you can get but this one is a great starting point. It really helps you wrap your head around dye concepts.


Now for your basic recipes. I start with dye concentrates from which I mix all my colors. Then I add water when I put them in the bottle.


Dye solution:
- this is what you mix your dyes in it is urea water and it helps the dye move through the fabric. You will not have good results if you leave this out.


1 cup water

2 Tbsp Urea

1-2 tsp dye powder (darker colors like black may need more but I have been happy with 2)


Use warm water to dissolve the urea first. ( The urea will lower the water temperature while dissolving.)
Add the dye powder and mix thoroughly (it likes to clump so it requires a lot of stirring to make sure it is all dissolved and not just sticking to the spoon or cup). **Do Not dissolve the dye in water over 95 deg. F. because it will seriously reduce the reactivity (sticking ability to the fibers) of the dye. NOT a good thing.
Makes 1 cup + dye concentrate. For most at home projects (a couple of shirt or yards of fabric) you will need a lot less of each concentrate so adjust the recipe accordingly.

How long will this last?
It is said that it will last up to 1 week at room temperature and longer if refrigerated. I however haven't had much luck with it lasting more than a day or so. I sadly found the colors to be dull after 2 days. So it is better to make less and have to mix up a bit more than to make more and waste it. Sad day!

What colors to mix?
I use lemon yellow, fuchsia red, turquoise, and better black. I usually need 2 of the yellow to 1 each of the red and blue. I also use about 1/4 to 1/2 the amount of the black so make a lot less of that.

Now What ?

I have given you recipes for concentrates. You are going to want to dilute these. I mix these half and half with water. BUT First! I mix the colors. I mix them right in the squeeze bottle and then add an equal amount of water. (Basically I fill the bottle half full with color and then fill the rest with plain water. )


Mixing Colors
When I am dying I usually the the muse take over and do colors by my mood. However there are some basics that I do.
I love fuchsia and turquoise but sometimes I want a true red and a true blue.
To get this here is what I do.
True Blue = 7 parts turquoise and 1 part fuchsia
True Red = 7 parts fuchsia and 1 part yellow

Now for the other colors - well I wing them, but here is what I have found. I swirl what I am mixing in the bottle (before I add the extra water) and try a drop on a white paper towel (the really fluffy ones work best) and see if I like what it does.
Orange - mostly yellow with a bit of fuchsia. I swirl the bottle and will test a drop to see if I like it
Vermilion - more like 3/4 yellow to 1/4 fuchsia maybe a bit more
lime green - mostly yellow and a little bit of turquoise till you like it
grass green - mostly yellow with a bit more turquoise
Purple - about 3/4 turquoise and 1/4 fuchsia but test it and see what you like
Wine - about 3/4 fuchsia and about 1/4 turquoise and test
Golden yellow - almost all lemon yellow with a few drops of fuchsia - this is a warmer yellow
Pink - mostly water (might want to use plain urea water here) and a few drops to 1 tsp fuchsia or your true red
Light Blue - same as for pink but use the turquoise or true blue

The Magic of ADDING BLACK
-adding black to any color you make turns it into a jewel tone. It is lovely to see what it does.
Add it to your:
- reds and you have wine, Burgundy, and maroons
-Blues and you get peacock, teal, and such - gorgeous colors
-Greens and you get emeralds and some mosses

Moss and Earthy Greens - experiment here but adding golden yellow instead of lemon yellow makes more mossy, earthy greens. So.... try adding a drop or two a few of red to your greens. The results are really gorgeous.

Browns -- These are hard to predict. I just mess with oranges and blues or greens and reds to get a color I like. I have ordered brown dye right from dharma trading co. and loved them. I have tried chocolate brown and golden brown and love the fun of them both when mixed with other colors like yellows, oranges, reds and even greens.

Dye Fixer
I almost forgot but this is just as important as the rest.
9 Tbsp Soda Ash
1 gallon water

Mix the soda ash in hot water till dissolved. This is used either before or after the dye is applied to your fabric. Without this chemical your dye WON'T work. In the tutorials to come, I will tell you how to use this solution for each project.
This will keep for a very long time. In fact, I have never had it go bad.

Wednesday, September 08, 2010

Dyetorial - Tye Dye Tutorials

I love to Dye fabric, shirts, what ever. I would like to start sharing some of these techniques I have used over the last 20 years of dye sessions I have had with my family and friends.

Dyetorials

Supplies:

I get my dye supplies from Dharma Trading Co. I trust them and have been getting my shirts, fabrics, dyes, and dye chemicals from them for well over 20 years. They are easy to work with and prompt in their shipping. They also have lots of helpful ideas.
If you have never dyed before I suggest you get yourself a starter kit, here. It has everything you need to get started and has step by step instructions for mixing and using your dyes. It is a very thorough and affordable way to get started.

What I use:
My favorite dye colors are
Procion Fiber Reactive Dyes
I recommend starting with the 4 basic colors. These are the pure colors from which all other colors are mixed.
They are:
Lemon Yellow
Fuchsia Red
Turquoise
Better Black
Later I will post a chart for mixing that I use and maybe it will help you too.

Chemicals you need:
Urea - makes water wetter so it goes into the fabric better and takes the dye with it.
Soda Ash - Dye Fixer - kills the dye and permanently bonds the color to the fibers of the fabric
Synthrapol - Dye suspender (?) It catches the used dye and gets it out of the wash when washing out the dyed shirts - this comes with a heave duty warning so please read before choosing to buy - I have used Dawn dish soap in a pinch and it works too but results may vary.

Equipment:
Mixing cups, spoons, etc...
Squirt bottles - I have found these to be a must and these here last for years
Top loading washing machine - front loaders don't have enough water - if you don't have one, find a friend that does and will let you use it, Make them a Shirt in return. :o)
Plastic sheeting to cover you work surface
GLOVES - A must for your hands. This stuff is messy and makes explanations in public less awkward.
Dust mask - a must when mixing the dye - you don't want that stuff up your nose, it isn't toxic but exposure can make you allergic and hey that would be tragic! No dye would make me a very sad girl and maybe you too.

Well I have to run off to Girl's Day out. I will start posting Dytorials tomorrow!

Tuesday, September 07, 2010

Meet Mortimer

I have a little turtle.... um I mean tortoise*.....

Tortoise 015

I NEEDED to make a tortoise the other day and so I did.
My little boy took off with him and named him Thomas. Thomas is his new snugly buddy at bed time and his run through the muck friend during the day. (Shout Hurray for Totally Washable toys!)

Then I had to make a smaller one. I wanted one to have in my sewing room. I NEEDED my own.
Tortoise 028
Meet Mortimer. He is a very quiet little friend and just the right size to sit on my self.
I couldn't then just make one so I made a couple of each and had some fun in the yard with them.

Tortoise 021
First Thomas found a friend. Her name is Tiffany.
Now.....
Tortoise 025
Mortimer now has a sister named Matilda.

Tortoise 033 C
We have a whole little Tortoise family.

Tortoise 035
And they are off on the own grand adventures... maybe to meet the Hare family.

You can make Mortimer and his whole family yourself.
The new PDF pattern is available at my Etsy Shop.

Tortoise 025

Wednesday, August 04, 2010

Yes Your Blueness!

I haven't just been cooking this summer. I just haven't been taking and processing photos of the other things we have been doing. I have been to a couple of really fabulous yard sales and flea markets. Here are a few of the finds I have done something with.


Blue Buffet

I found this Buffet at a local City Wide yard sale. I got it for $50. It was it really bad shape. It had been left out on a porch for years in the rain and had been chewed by some animal. So... We sanded it down and painted it this lovely aqua blue color.

Quilt Squares

I found these quilt squares at the flea market. The colors chosen are simply fabulous. Don't know what I will do with them (am open to ideas), but for now I will enjoy they colorfulness.

This project wasn't exactly a yard sale or flea market find. My Bro-in-law, works in a custodial position and, as such, comes across discarded items and shares them. Well a couple of years ago he got a ton (I mean ton!) and gave them to everyone he knew. We had about a dozen. They were great because a.) they were free, b.) they were sturdy, and c.) they were stack able. Well they also had a down side. They were covered in a loosely woven brown cloth. This was not so great with lots of little kids. After a few months they looked like they were covered in yarsh because of spilled food. They were not easy to clean.

Well this summer I was going to burn them and then I thought maybe I could cover them with something very kid friendly, cute and easy to clean..... Oil Cloth. Now, a few coats of white paint later, and some very fun fabrics from etsy, and I have a set of very fun kitchen chairs.

Chairs AChairs B

Here are a few more. Sorry I can't give you better pictures. The kitchen is being re-done right now.

Monday, August 02, 2010

Cheezy Onion Rolls

Holy Macaroni! These are so tasty. I have to share.
Cheese Rolls, Cake, and James 004

My sister shared this recipe with us and it is now a new favorite. Will be subbing my roll dough recipe so I can make this Whole Wheat ASAP!

Cheezy Onion Rolls

Filling
1/3 cup dried minced onions
1/3 cup hot water
1 tablespoon Pizza Seasoning
1/2 cup Cheddar cheese powder (can sub Parmesan cheese if you don't have powdered cheese)
1 tablespoon soft butter

Dough
1 large egg
3/4 cup warm water
2 teaspoons instant yeast
3 tablespoons soft butter
1 1/2 teaspoons salt
3 cups Unbleached All-Purpose Flour
1/4 cup Dry Milk
2 to 3 tablespoons shredded mozzarella or Parmesan cheese

Directions:
To make the filling:
Soak the minced onions in 1/3 cup hot water while making the dough.
Stir in the Pizza Seasoning, cheese powder, and butter just before you're ready to shape the dough.

To make the dough:
Whisk together the egg and warm water.
Add the yeast, butter, salt, flour, and dry milk.
Stir to combine, then knead the dough until it's smooth and elastic, 5 to 10 minutes.
Place the dough in a lightly greased bowl, turning to coat all sides; cover it and let the dough rise until it's doubled in bulk.
Turn the dough out onto a lightly greased work surface.
Roll the dough into an 18" x 10" rectangle.
Spread with the onion mixture, leaving 1" free of filling
Roll the dough into a log, pinching the seam closed.
Cut the log into 12 slices using string or dental floss.
Place the rolls on a greased baking sheet, leaving about 1" between them.
Cover and allow to rise for until puffy.
Sprinkle with additional cheese, if desired.
Towards the end of the rising time, preheat the oven to 350°F.
Bake the rolls for 22 to 26 minutes, or until golden brown.
Remove them from the oven, and cool on a rack.
Cheese Rolls, Cake, and James 002
Yield: 12 rolls.

Wednesday, July 21, 2010

Blueberry Cheesecake Pie

OK this is my favorite blueberry recipe. It is the recipe that makes me excited about blueberry season every year. It is also the dirtiest recipe card in the box. So.... you know that means it is the best one! I don't remember where we found this one but it is now a family tradition. We get this treat once every year.
Blueberry n' Strawberry pies 007
Blueberry Cheesecake Pie

2 (8 oz pkg) Cream cheese (room temperature)
1 1/2 tsp grated lemon rind
2/3 cup sugar
1/8 tsp salt
3 large eggs
Blueberries (at least 4 cups)
Graham Cracker Crust (recipe below or use a purchased crust)
Glaze
Whipped Cream

Crust - Mix 1/2 cup graham cracker crumbs, 1 Tbsp sugar. Butter a 9" pie pan generously. Press crumbs on bottom and sides.

Let cream cheese stand at room temperature for 1 1/2 hours Then beat with rind until creamy. Add sugar and beat, add eggs one at a time. Beat for 5 minutes until smooth and creamy. Fold in 1 cup blueberries. Pour into the crumb lined pan.
Bake at 350 deg. F for 30 minutes or until set. Cool
Top with 1 pint fresh berries. Spoon Glaze over the top and garnish with whipped cream.

Glaze:
1/4 cup sugar
1 1/2 tsp cornstarch
dash of salt
1/2 cup water
1 cup blue berries
1 Tbsp lemon juice
Mix sugar, cornstarch and salt. Add berries and water, bring to a boil, stirring. Cook, stirring for a few minutes or until thickened and clear. Strain and add lemon juice. Cool.

Variation:
Top pie with 1 to 1 1/2 cup sour cream and 1 pint blueberries.

Saturday, July 10, 2010

Strawberry Glace Pie

Sorry for the "not posting"ness going on here. I got shingles and life had to slow down in a big way quick to get better.
Now I am less stressed, spot free, and ready to post some more fun that has been going on in the background.

This is my favorite fresh berry pie recipe. My mom has made it for years. It is now comfort food for me. It is great with any berry. I have made it with strawberries, blueberries, blackberries, and raspberries.

Blueberry n' Strawberry pies 004


Strawberry Glace Pie

Baked 9" pie shell
1 1/2 quarts strawberries
1 cup sugar
3 Tbsp corn starch
1/2 cup water
1 Tbsp butter
1 Cup whipping cream, whipped
2 Tbsp powdered sugar (optional)
3 oz cream cheese (room temp.)
1 Tbsp milk

*Wash, hull, and drain berries. Mash enough of them to make 1 cup.
*Combine sugar and cornstarch. Add crushed berries and water. Cook over med heat, stirring constantly, until mixture comes to a boil. Cook for 2 minutes, stirring constantly. Mixture will be thickened and translucent. Remove from heat and stir in butter. Cool.
*Mix the cream cheese with the milk and spread in the bottom of the pie shell.
*Place whole berries in pie shell with points up. Pour cooled berry mixture over the berries and chill for at least 2 hours.
*Serve topped with whipped cream sweetened with the powdered sugar if desired. Garnish with extra berries.
Enjoy!

Thursday, June 17, 2010

My Best Friend

On this day, fifteen years ago,
I married by best friend.
Wedding Day
He is still my best friend.

Fresh Blueberry Muffins

I promised I would share some of my favorite Blueberry Recipes with you while we are enjoying our own fresh blueberries.
Blueberry Muffins 004
Blueberry Muffins

1 cup unbleached flour
1 cup whole wheat flour
1/2 cup + 1 1/2 Tbsp sugar
1 Tbsp baking powder
1/2 tsp salt
1/2 tsp cinnamon
1 1/2 to 2 cups fresh or frozen blueberries
1/2 cup butter, melted
1/2 cup milk
2 eggs
1/2 tsp vanilla
  1. Pre-heat oven to 425 deg F. Butter muffin tins.
  2. Combine dry ingredients, except 1 1/2 Tbsp sugar, in a bowl and blend well.
  3. In a separate bowl, toss 1 Tbsp of the dry stuff with the blueberries and set aside.
  4. After butter has cooled slightly, stir in milk, eggs and vanilla. Blend well.
  5. Add egg mixture to dry ingredients and stir until well moistened. Stir in berries.
  6. Spoon batter into muffin tins. Sprinkle tops with reserved sugar.
  7. Bake 15 min until golden brown. Let muffins stand 5 minutes before removing from tins.

Enjoy.

There are a few more lovely Blueberry recipes to come, IF, I can get pictures of them before my family snarfs them all.

Wednesday, June 09, 2010

It's in the Pudding

I have to say that pudding is my favorite treat of all time. My dad used to make cooked pudding for us when I was little. He would make it when we were all getting ready for dinner and would put it in a little dish in front of your plate at dinner. If you finished dinner quickly, your pudding was still warm (which meant that you most likely liked dinner.) If you didn't finish your dinner, you didn't get the pudding. I loved my dad's pudding, so I tried to finish my dinner. He made vanilla, chocolate, coconut, and banana. Often he would put a blob of jelly in the middle of the hot pudding. It would melt and run into the cracks of the surface of the pudding. I loved that!

Well now I make pudding for my children. They like it hot and cold and anywhere in between.
Sunday afternoon we were all wanting a treat and none of the usuals really sounded like they would do. Then we thought of good old vanilla pudding and we knew that was just the thing.

The recipe I use now is a combination of my dad's quickly recipe and my mom's cream pie filling recipe she got from her mom. It has all the flavor and texture I want in a pudding and the speed of my dad's "get it done" kind of cooking.

So for our Sunday evening treat we had vanilla pudding with fresh straberries, blueberries, and sliced banana. It was heaven!
Pudding Parfait 002
Vanilla Pudding
5 egg yolks
3 cups milk
1/2 cup sugar OR 1/4 to 1/3 cup agave nectar (love it!)
1/4 cup corn starch
1/2 tsp salt
1 tsp vanilla extract
2 Tbsp butter (option - I usually forget to add this)

I put the milk and egg yolks in the blender and blend well. This makes it so you don't have to strain the hot pudding for "egg boogers" later. Pour this into a good heavy sauce pan. Then add the sugar, salt, and corn starch. Mix well with a whisk. Turn on to med to med-hi heat on your stove top and cook, stirring constantly until it thickens. Remove from heat and add the butter if you are using it. Then add the vanilla extract. Serve now or pour it into a covered dish and cool in the fridge.

Monday, May 24, 2010

Blueberries for Me

May Stuff 10 020
I am so excited I can't stand it! I have my very OWN blueberry bushes. I have always wanted them but never thought I would get to have them. Last fall a blueberry farm near us when out of business and sold off all their mature bushes for $10 each. I got myself 6 lovely bushes. I am so happy. I would have bought more but these weighed a ton and were hard to get home. I can't wait till June when they are ripe.

Tuesday, May 18, 2010

Breakfast Shakes

Shakes for Breakfast
Here is another quicky breakfast we fix here for the kids. It is nutritious and delicious so kids say YES! and so does mom. My kids actually like to fix these as after school snacks when they get home.
We have several that we make.
My kids make them in our regular old blender that we have had for YEARS. It works fine. Sometimes the ice isn't all crushed but they don't seem to mind. When I make the milkshakes I now use my high power blender. I have a Health Master. I have liked it so far but don't recommend it to anyone. There are too many potential problems. I am already smelling the "hot machine" smell when I use for anything difficult which is what they advertise it for. If I had the purchase to make again I would get a Blendtec home blender. I have a friend that has had one for a long time and loves it and it still works beautifully. I wish I had been told that this was a better buy. I would have saved the $$ and bought this one instead. Hind sight. Oh well! On to the shakes. The advantage of the high power blenders is that they work way faster and I can blend up things in them that I can't in a blender, such as nuts and grains which add health benefits to my kids food.
Banana Milk Shake
1 cup milk
1 whole banana
2 Tbsp Peanut butter
1 Tbsp cocoa powder (I think we actually use a lot more than this) ☺
2 Tbsp whey protein powder (I don't do soy but you can if you like)
1 cup ice
Sweetener of your choice (we use honey, agave syrup, sucanant, or stevia depending on what is on hand)
1 tsp vanilla
Put everything in the blender and blend like mad until it is smooth.
This makes enough for 2 kids. In the big blender I will double or triple this recipe for the whole family.
Orange Julius
1 cup milk
1 cup carrot juice (originally called for water but hey I slip in veggies where I can. )
1 cup ice
6 oz orange juice concentrate (half a regular can)
1 tsp vanilla
2 Tbsp whey protein powder
Sweetener to taste - with the carrot juice in there it doesn't take much and again we try to use healthier choices like agave syrup
Put everything in the blender and blend like mad until it is all smooth and yummy.
In the big blender I skip the carrot juice and just put in 2 raw carrots for this recipe. For the whole family I double this recipe in the big blender and blend the carrots and liquids first before adding the ice. It does a great job of liquefying the carrots.
Berry Smoothie
1 cup milk or orange juice or plain sweetened yogurt
1 cup frozen berries ( or frozen fruit mix)
sweetener if needed (or sometime we just add a banana and that is plenty sweet)
Put in blender and blend like mad till it is as smooth as you like.
Big blender berry smoothie
2 1/2 cups milk, Orange juice, or plain sweetened yogurt (or a mix of any of the three)
1/2 cup old fashion oats
handful of nuts
2 Tbsp flax seed - ground
1/4 cup whey protein powder
2 tsp vanilla
Blend this till smooth
Add
1 banana
2+ cups frozen berries of your choice - we like to buy the big bags of mixed fruit with strawberries, mango, pineapple, peaches and grapes.
If you think it needs sweetening, you can add a squirt or two of agave nectar or another sweetener you like.
This takes the higher power blender to get the oats and nuts blended enough to be able take. The kids and I really love this. It really fills you up and lasts all morning.
I have tried adding the flax seed, oats and nuts to all the above recipes and we like the addition. It does change the texture though.
I got the idea for this recipe from my friend Vea. Go check out her blog for more ideas for great food and money saving tips.

Wednesday, May 05, 2010

Simple Breakfast

Simple Breakfast
I don't know about you but that looks really yummy to me. I picked the idea for this breakfast up from an old diet book I found. It is just fruit, cottage cheese and nuts. It fills me up and keeps me going all morning. With the fruit, I have enough carbs to get my brain going. With the cottage cheese, I have enough protein to keep be going. With the nuts, I have enough good oils to make me feel satisfied. I love it. You can substitute what ever fruit you like with the cottage cheese. I have used strawberries, grapes, melon, and pears. I love them all but the pears are my favorite right now.
Simple Breakfast
1 cup cut up fruit
3/4 cup low fat cottage cheese
a handful of nuts (not roasted, raw)
Give it a try, you will love it!

Tuesday, May 04, 2010

Carb Plan


My dear blogging friends,


I have something I need to share and maybe by doing so I can encourage myself to stick to it.


Since having my five little Byrds, I have had a really hard time keeping weight off. Due to metabolic problems that are a part of life with Thyroid disease, I just can't seem to keep it off. However there are some things that seem to help.


I exercise everyday for at least 20 minutes and my calorie burn goal (set by my Dr) is 300 calories per day.


I also try to watch what I eat. We already use whole grains; honey, sucanat, and stevia instead of sugar; we also eat fresh fruits and vegetables and have a garden. Still weight is an issue for me. I have found though that a carbohydrate monitoring diet helps. I can't have a very low carb or no carb diet or I get sick because of hypoglycemia. That isn't fun and I get really grouchy.


A few years ago my SIL gave me a print out of a diabetic diet she was using and liked. I gave it a try and have loved it. When I use it, I lose weight, don't get hungry, and generally feel better.


So I am posting this carb plan PDF version of it HERE.


Please remember that I am NO Doctor and that you should consult your physician before starting any new diet or exercise plan.


This is just something that has worked for me.

Here is how it works. It breaks down the food you eat into Carbohydrate (carbs), Proteins (meats), and fats. All three are necessary for your body function.

One diabetic serving of Carbs is 15 grams of carbohydrates. Each meal and snack lists the number of carbs you can have. It also gives you a limited list of foods and the number of carbs they have.

The thing I love about this plan is that it educated me enough that I could start planning my own meals with things that I love in the amounts that I can have. The first thing I noticed was that some of the foods I had been eating were not so great for me. When I ate my carb quota of them, I was still starving.

I also learned that 1 cup of raw vegetables has 5 grams carbs so that meant that I can eat 3 cups of vegetables which equals 15 carbs or 1 Carb choice in the plan. Well that fills me up and I love them! That also usually left me 2 Carb choices for that meal that I could fill in with all kinds of things that I wanted to eat. I could even "afford" to have a cookie or small dessert now and then.

I grew with the plan and went to several websites to learn the "carb" amounts for ingredients I used often. That way I could tweak my own recipes so they were better for me and I could regulate the portions to comply with the diet.

I have also incorporated several South Beach Diet ideas into what I am fixing. Kalyn's Kitchen is a great place to get recipes and ideas for low carb recipes that work well in any diet.


Whew, that was a lot of typing. Can you tell I feel strongly about this?

Anyway my friends, I wanted to share this tool with you. Maybe it will help you in your quest for a healthier life style.

**Note**
This diet is set for a preganant or lactating woman. For my regular diet I just cut back on the fat and carbs some or have 3 cups of veggies be one of two carb choices at a meal. That gives you lots of food, lots of fiber, still has carbs for good blood sugar levels, fills me up .... etc.

Tuesday, April 13, 2010

From My Files

Recipe Treasures
This is a shot of some of my recipe files. These folders are almost 30 years worth of recipe collecting and perfecting. There are some serious treasures in here. Problem is the recipes don't always make it back into their folders and the folders don't always make it back into their box.
One of the reasons I share so many recipes on this blog is to ensure that some of the best of these recipes are not lost.
Here is one of my children's favorites. It is simple to make, requires few ingredients, and always makes them happy.
Donburi is basically Japanese fast food. It consists of a bowl of hot, sticky rice and some meat, eggs, or vegetables on top. This particular recipe only has eggs and onions but any veggies could be added for more nutrition and flavor.
Egg Bound Onions
Tama Tama Donburi (egg bound onions)
1 onion sliced
1 cup water
1 tsp hondashi (fish soup stock flavoring)
1/2 tsp salt
4 Tbsp Soy Sauce
2 Tbsp Mirin + 1 tsp
4 eggs lightly beaten
Put everything but the eggs into a pan and boil till the onions are translucent.
Pour the eggs over the onions in a thin stream. Cook just until the eggs are set. DO NOT STIR.
Remove from heat and serve over rice.
Variation:
Add any chopped veggies to the onions you like such as carrots, celery, broccoli, etc.
Related Posts Plugin for WordPress, Blogger...