home tutorials recipes aprons/patterns Soaps

Wednesday, December 28, 2011

Pear Pie

Pear Pie


I crave this pie (OK I crave lots of pie but I really do love this one!)

I first had this pie at my Brother's house in Spring City Utah. My sister-in-law, Lee, is an amazing cook and shared this recipe with me 20 years ago. The beauty of this pie is that it can be made with fresh or bottled pears.

Lee's Open Face Pear Pie
9" pastry shell
4 medium pears*
Juice of 1/2 Lemon
1/4 cup butter
1 cup sugar (we cut this to 1/2 cup)
1/4 cups flour
3 eggs
Pinch of Salt
1 tsp vanilla
1/8 tsp ground mace**

Directions:
Peel, halve and core the pears.
Brush w/lemon juice.
Place pears cut side down in pie shell w/narrow ends toward center.
Cream together butter & sugar.
Beat in flour, eggs, vanilla and salt.
Pour over pears, sprinkle lightly w/mace.
Bake at 350 F for 45 minutes and cool.

* Can use bottled or canned pear half (or even chunks, as long as you have 4 pears worth.)
**Can substitute nutmeg for mace

Saturday, December 24, 2011

Last Minute Apron Tutorial

I have dusted off my Apron Tutorial writing skills and whipped up a Last Minute Apron (& Stocking) Tutorial for my blog world friends. It is actually featured over on Apronista. So... I will just post a link here for you.

Stockings and apron 018


Enjoy!
P.S. I got my lovely Dishtowels at one of my favorite quilt shops (in Historic Carthage Mo.), Block by Block which is run by my dear friend Amy. Go check out her on-line store!

Wednesday, November 09, 2011

Shawnee's Secret Santa Swap
Secret Santa Swap

My dear friend Shawnee is doing another one of her lovely swaps. It has been ages since I had time to participate in one and this one just looks like so much fun.

If you are interested in checking it out...

Go here!


As part of the swap, I am required to answer these questions for my partner.

So here goes...


What are your hobbies?

I like to sew, quilt, read and cook.
What are your favorite colors?

I love bright colors, especially reds. I love vintage 1930's and 40's colors.
Do you collect anything?

I collect salt and pepper shakers, old plates, quilting fabric, cookie jars
Are you allergic to any fibers or animals?

No
Do you have any pets?

We have dogs and cats (outdoor animals)
Coffee, Tea, or Chocolate?

NO to coffee and tea, but I do love chocolate!
What do you like to read?

I love Anne Perry, Robin McKinley, but best of all Jane Austen, and the Bronte sisters...
Do you prefer Cookies or Candies as a sweet?

I love both so either is fine!
What is your favorite holiday treat?

Actually cheese ball... but I love fudge, peanut brittle, divinity... OK I like it all.
Describe your favorite holiday tradition.

Everyday in December, I read Christmas stories with my children. We look forward to this all year. It is a special family time we have and I love it! They are great stories about the spirit of Christmas and doing and sharing with others.
Did you believe in Santa as a child?

YES! I hid behind the tree one year to catch him and woke to find the presents there around me.
When do you open presents?

We get to open Pajamas on Christmas Eve, we get stockings in the morning and the presents after a big family breakfast.
Do you put up a tree and when? If not, how do you celebrate?

We put it up the weekend after Thanksgiving.
Does your tree have a theme?

The theme for our tree is... handmade. My mother makes an ornament for each grandchild each year and that is what goes on our tree, along with things the kids and I have made for each other. There are a few store bought ones that have come along the way too.
What has been your favorite gift to give? to receive?
My favorite gift to give is the Pajamas I make for my kids each year. I try to design new ones every year to two. That is fun too.

My favorite to receive? how can I answer that? Gifts given with love are the very best!

Friday, October 07, 2011

Canned Pears 1920's Style

This has not been my year for produce. Late spring, chickens, and 6 weeks of over 100 deg temps and no rain pretty much put an end to everything in the garden. :(


Pears 1


I did get my hands of 2 bushels of pears. They are wonderful and we canned some of them. It feels wonderful to have them on the pantry shelf, 42 Quarts and 14 pints. Happy Dance!


pears 011 (750x800)


You might notice in the photo that I have skins on my pears.... Well... a few years ago I was canning my first batch of pears ever. I was peeling the pears and hating life. I didn't have time for that much fuss. My mom came in and heard me grumbling and said....


"Your Dad always liked them with the skins on."


Me: "What!? Can you do that?"


Mom: "Of course! That is how your Grandma Lucile always did them and it was the only way your dad liked them."


That was all I needed to hear. I stopped peeling the pears right then and there and have loved it. We tried a batch really quick to makes sure we liked it and found that they tasted better than the pears without the skins on. The skins have so much flavor and when you can them, the flavor is "infused" into the pears. If you don't, the skins do slide off easily after canning.


Why 1920's?.... well my dad was born in the 1920's and this is how his mom canned then and through the great depression.


Here is my recipe for canned pears.


Canned Pears 1920's Style


about 3 pears per jar


Extra Lite syrup - 5 1/2 cups water, 1 1/4 (1.25)cups sugar - bring to a boil


Wash pears.


Cut up pears and fill your jars to 1 inch from the top.


Pour boiling extra light syrup over the pears leaving 1 inch head space.


Soften the lids in boiled water.


Wipe the rim of the jars with a clean paper towel, place the lids on and put on the screw bands and finger tighten (that means you don't crank them down).


Process in a steam canner (or water bath) according to your altitude. For me in Southern Missouri I process for 35 minutes for quarts.


Let the jars sit in the canner for 10 minutes with the heat off and then remove and cool on a dish towel for 24 hours.


Remove the screw bands, wipe the jars clean (sometimes there is sticky syrup on them) and put away without the bands on them. Why?? (I asked that this summer.) Because.... it is easier to see that the seals are still good... and... the bands won't rust on you and cement themselves to the jars. Makes life much easier when you go to open the jars.


Thursday, October 06, 2011

Secret Sneaky Sloppy Joes

This is my all time favorite Sloppy Joe recipe. I got it from my sister Jeanne. She has the most amazing, wicked cooking skills of all my sister.... (don't tell the other 5).....
What makes this recipe so sneaky and secretive is.... It is chock full of cabbage. Seriously! And when you mix the sauce into it... it can look a lot like shredded beef.


sloppy Joe


Secret Sneaky Sloppy Joes

2 pounds ground beef
1/4 head chopped or shredded cabbage (I usually double this)
1 onion diced
2/3 green pepper diced
1/2 bottle of ketchup (how big is that ?? I use a large bottle)
2 stalks celery chopped
6 Tbsp brown sugar
1 tsp. salt
2 Tbsp Worcestershire sauce
1 tsp pepper
2 Tbsp Vinegar
2 Tbsp mustard
2 Cloves garlic
1 Tbsp liquid smoke (optional)

Brown the beef. Add the vegetables and cook for a couple of minutes.
Add the rest of the ingredients and bring to a boil.
Reduce heat and cook for 20 minutes. Stir occasionally to make sure it isn't sticking and burning.
Serve on buns or sliced bread and enjoy.

Monday, May 16, 2011

Outdoor Cooking Experiments

I think Facebook has taken a toll on my blogging. Sorry!
Recently we have been experimenting with some simple outdoor cooking methods.
We have made Penny alcohol stoves. They need some more experimenting and perfecting to get them to work well for us. We are also working on Buddy Burners. And this week, we made a Hobo stove. I hope to put some more detailed instructions of how to make them with your family. Here is a picture of ours. We fixed bacon and eggs with it and it worked but we discovered there are some kinks to work out still. I hope to be bosting some tutorials with what we have learned.


Outdoor cooking with JEB 003 (456x800)

Tuesday, February 22, 2011

Jeddie's Fabulous Fish Sticks

The idea for this recipe came from my little boy's Sesame Street Cookbook. Oscar has a great fish stick recipe in there and we adapted it to what we had on hand.

Jeddies Fabulous Fish Sticks


Jeddie's Fabulous Fish Sticks

Fish Fillets - cut into strips (talapia, cod, and orange roughy are good)
milk
flour
bread crumbs
seasoning mix (we like Mrs. Dash Table Blend)
pepper
butter

Cut your fish into eatable strips (what ever size you like).
Set out 4 pie tins or deep plates
-In the first one put milk
-In the second put flour
-In the third put the bread crumbs and the seasonings (I started with 1 cup crumbs and about 1 tsp seasoning and had to keep adding but we use lots of fish). Pour the melted butter (about 1/4 cup) over the crumbs and mix together.

Dip the fish pieces in this order
1-milk
2- flour
3- milk (quickly so it doesn't get soggy)
4- Bread crumbs, seasoning, and butter mix

Then put them on a baking sheet.

Bake at 450 deg F for 10 to 15 minutes depending on how thick the fish is.
They are done when the fish fakes apart with a fork. We noticed that the fish looked a little "soft" when the timer went off but that it firmed up as it rested a little on the tray. Test it with a fork.
Serve with your favorite sauce.
Ours is store bought tar tar sauce. I know I should be making my own but I haven't found and remembered a recipe I like yet.
We are open to suggestions. :o)

Another great cookbook to use with children is Kid's Favorites Made Healthy.

Sunday, February 13, 2011

Soap Winner!

Thank you to all that stopped by and left a comment.

Soap Day 002


The winner of my soap giveaway is....


Schneiderbären said...
Danke für das schöne Candy, Deine Seifen sind einfach super.

Liebe Grüße
Claudia

She gets to pick out 10 scents and I will send them off her way.

Sorry to those of you that didn't win. Thank you for checking out my Etsy shop and giving it some LOVE. :o) You are wonderful.

I will have another fabulous giveaway from my shop in another week or two so come back and check soon.

Friday, February 11, 2011

Friday Give Away! - Soap Samples

I have been snowed in for almost 2 weeks with my five kids. I am ready for something fun today!

Snow day

(we actually got a lot more snow than this, this was the first little bit of snow)

So .... to break the the monotony I am doing a little give away.

I have chosen to give one of my Sample Size bar packages. These bars are 1/4 the size of my regular bars. It gives you a chance to try several of the soaps with having to break the bank to check them out.

sample bars 025

This Sample Pack is for 10 bars of your choice.

If you are picked as the winner, you get to pick the 10 sample size bars I send you.

And YES it is open to international bloggers.

I will take comments all day today and will pick a winner Saturday night/Sunday morning.

To enter the giveaway, leave a comment.

To get an extra entry, go to my etsy shop and favorite it and come back and tell me what soaps you like.

To get 5 extra entries, post the giveaway on your blog (or facebook page) today and come back and leave a link to your blog.

Tuesday, February 08, 2011

Oort Clouds - A Snow Dying Tutorial

300 posts!! I can't believe it and here is another tutorial.


Blizzard 2011 001


Welcome the the Blizzard of 2011. I have lived here in Southwest Missouri for over 25 years and have never seen snow like this. We got 20 inches of snow last week and it is still here. Amazing. The funny thing about Missouri weather is that it changes all the time. Just over a week ago we had temperatures in the 60's and 70's. The kids were wearing shorts outside. Then 3 days later we were in the middle of the biggest blizzard I have seen since I was a little girl. (maybe not even then)
We cancel school here when there is 1 inch of snow. We are on our second week of NO SCHOOL (except for the one kid doing home school, poor kid just keeps plugging away at his work).
With so much snow at hand and no prospect of it melting for a week, we decided to give Snow Dying a dry. I have seen fabrics labeled as "Snow Dyed" at quilt shows for years but never had enough of the white stuff to give it a try. Well now I got my wish. Happy day!!!


Snow Dye


The procedure is very simple and so much fun to watch.

1. Prepare your fabric for dying by soaking it in Soda Ash solution (1/2 cup salt, 1/3 cup soda ash, and 1 gallon hot water). Soak the fabric for 30 minutes. The fabric has to be 100% cotton and pre-washed to strip off any finishes. Squeeze out the fabric.


Blizzard 2011 013 (800x527)


2. Scrunch up the fabric in the bottom of a tub. You can fold it too.


Blizzard 2011 014 (800x800)


3. Pack the tubs with snow.


Blizzard 2011 015 (800x534) Blizzard 2011 019 (800x547)


4. Sprinkle dyes right on the snow. I use Dharma Trading Co for my dye supplies.

Blizzard 2011 001 (385x800)


5. Watch the snow melt. This will take a while unless you have a very well heated room. I used my laundry room which has no heat to it. So.... The next morning the snow wasn't that melted. I moved them to the kitchen and them started melting pretty quickly.

6. Finally rinse them out under running water until the water is mostly clear. Then wash them in a top loading machine with synthrapol detergent. If you can't get this, you can use some Dawn dish detergent (about 1 tbsp for a full load).
I washed mine twice, the second washing was in my front loader machine on sanitize with my regular detergent. Then dry them.

Here are some close ups of some of the fun bits.
Blizzard 2011 016 (800x533) Blizzard 2011 017 (800x533)
Blizzard 2011 018 (800x533) Blizzard 2011 024 (800x533)

My daughter thinks they look like Oort Clouds. I think she is right. :o)

I think the browns are my favorites. That could just be because they are warm colors and it is so cold this week.

TIPS:
The thing I found to make the most difference was using "mixed" colors not pure primary colors. As mixed color dyes move through the snow and the fabric, they separate and move at their own speeds. This results in the best coloring on your fabric with the most crackles and fissures on the cloth. I love it!! I can't wait to try it with some serous greens and yellows. Only problem is what to do with the fabric now. Sad thing is they will most likely just end up as soap wrappers. I use my own hand dyed fabrics for my soap wrappings.
I think the colors are so much more vibrant because I used dye powder directly on the snow instead of dye solutions. This makes the colors more intense.
Next tries might include putting the fabrics or a rack instead of in tubs so the water drains away. Will see what affect that has. :o)

Monday, February 07, 2011

My Own Towel

With a vain attempt at order..... we made some personalized towels this week. The theory is that if you have your OWN towel, then you will be responsible for it, not leave it on the floor (because Mom WILL know it is YOURS).
At any rate the kids love them and maybe that alone will help them to take care of them. I love new towels too. I let the kids pick out their towels which gave them some ownership in the project which is always a good thing. :o)


Towels tutorial


Here is the quick and dirty tutorial to personalized towels.

1- Print out (or draw) your initials. Very Fat, Chunky letters do a better job of showing up and showing off fun fabrics. Be sure to reverse the letters or they will end up backwards on the towels.
Aprons 005 (800x533)
2 - Trace the letter onto the paper side of "Lite Heat 'n Bond" (my fusible web product of choice).
Aprons 007 (800x534)
3 - Cut out around the letters, leaving a boarder of paper around the letter.
Aprons 011 (800x746)
4 - Iron the letter the back side of your fun fabric. (follow the fusible web instructions)
Aprons 013 (800x534)
5 - Cut out the letter on the lines and position it on the towel and iron in place (follow package instructions again).
Blizzard 2011 013 (800x484)
6 - Stitch around the letter using a zig-zag or satin stitch.

Blizzard 2011 014 (800x533)


7 - Add a tab for easy hanging (optional).

Towels
These make great party favors for kid's parties or birthday gifts. Use a picture like a crown, shield, car, cat, etc. and have a stack ready for spur of the moment birthday gifts for your kid's friends.

Tuesday, January 11, 2011

Crumpets For Me!

Tea and crumpets
I love reading books that have great food descriptions in them. I love food and it is one of the details I love to see in the background of a story. Growing up I read many English literature books and was always interested in what the people had for "tea". I was especially interested in crumpets since I had never seen or had them before. I imagined all kinds of cookies, cakes and such when I heard the word. I was very disappointed when I finally had one and found that they were like English muffins. Not one of my favorites.

Then I was reading one of Anne Perry's William Monk books. In it Hester was snatching a precious moment to herself and got to eat a hot crumpet with her tea. This was a rare treat for her. She described the crumpet with it's crispness and softness and the hot, melted butter that was in danger of running down her elbows if she didn't hold it just right and eat it quickly enough. I was sold on crumpets right there.
Now, after some searching, I have found a recipe that I like and I can enjoy a crumpet to myself (or with my kids). I hold it just right and eat it quickly to prevent the pool of melted butter from dripping on my hand and running down to my elbow.
I did have to do some searching.
The first recipe I found to way too much time, 3 hours from start to first crumpet.
Sorry!
When I want a crumpet I want it now not at next meal time.
Then I found the baking powder versions and was so excited.
However, I found that many of these sacrificed flavor and many of them tasted like flour paste. That is NOT good eats.
I have found some medium ground though.
I found some recipes that use both yeast and baking powder.
The time is cut down to 15 minutes and the flavor is fabulous.
I have found that those that call for eggs taste the very best.
So.....
Here is my recipe for crumpet, whole wheat crumpets no less.
(white flour can be substituted or mixed half and half with the wheat.)

Miss Lucy's
Whole Wheat Crumpets

4 cups flour
(whole wheat, white, or a mix of both)
3 cups hot water
2 tsp yeast
2 tsp sugar
2 tsp salt
2 Tbsp baking powder
6 eggs
9 Tbsp Non-instant powdered milk (1 cup instant)
2 Tbsp oil or melted butter

In the hot water (not too hot or you will kill the yeast) add the sugar, eggs, oil and yeast. Mix well and set aside.
In a large bowl mix the flour, baking powder, salt and powdered milk.
Add to the water mixture and mix well.
Let the mixture stand for 15 minutes.

Prepare your griddle or large frying pan by heating it on medium for several minutes.
Oil your crumpet rings. I do this by pouring some oil into a small bowl and dipping or rolling the rings in the oil to coat. Set the rings on the hot griddle for a few seconds before adding the batter.
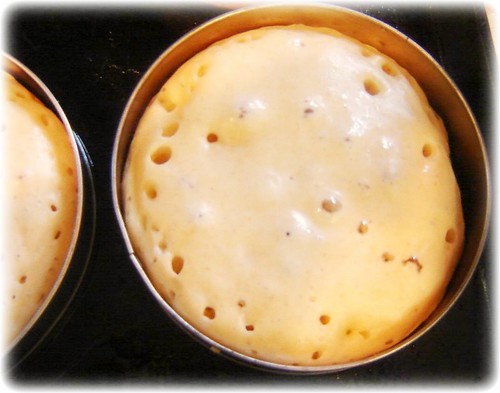
When the time is up, add a scoop of batter to each oiled ring. The rings should be half filled.
Cook at medium heat until the edges start to look "dry" and they have holes in them.

Crumptes 001


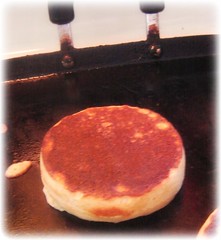
Remove the rings with tongs or pliers.
crumpets 002
Flip the crumpets and bake on the other side.
Serve hot with butter and jam.
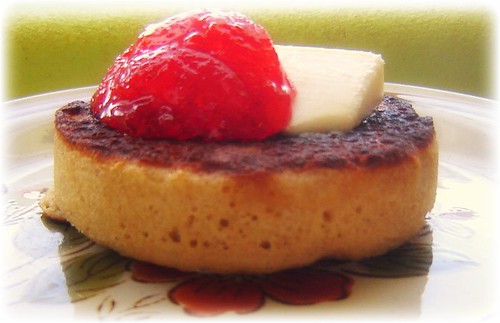
crumpets 005

Enjoy!
** Hot milk can be substituted for the hot water and powdered milk. (It is winter here now and fresh milk is not as abundant as it is in the summertime. We don't buy milk from sthe store, only the dairy.)

Thursday, January 06, 2011

Sneaker Saver Tip

Yay for a new year. I am hoping to post some more tips and tutorials this year. Here's to hoping.
sneaker saver
Does anyone in your house have a very loved but very stinky pair of old (or new) sneakers? Well someone at my has does or did I should say. One of my kids has had the stinkiest shoes and it doesn't seem to matter what we do they just stink. I have washed them, soaked them, treated them and nothing worked.
Then I found a scribbled note in one of my many folders of random info. It was for a stinky shoe treatment that is all natural. Yay! for my random note taking. So here is the recipe I found:

Sneaker Saver
1 small box baking soda (doesn't really matter what size)
several drops of Eucalyptus Essential oil (I would maybe use 1/2 tsp per pound of soda)

Directions.
Mix the baking soda and essential oil in a bag or container with a lid. Mix well and let it sit for a couple of days. This lets the oil get evenly distributed through the soda. Shake every now and then to make sure it is mixed.
Pour some of the baking soda mix into the bottom of the shoes to cover the bottom. Let it sit for a day or two. Then dump it out and check the shoes. If they don't smell sweet enough for you, do it again. One reluctant pair of shoes I tried it on took two treatments. You will be amazed at how scent free they become.
Enjoy!
Related Posts Plugin for WordPress, Blogger...