


Teaser!!!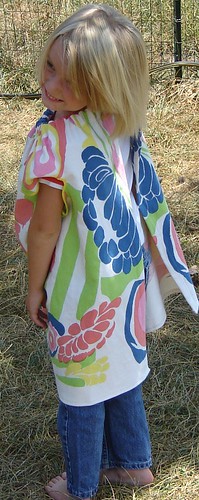
I finished uploading all the photos but have to run out the door to work for a couple of hours. I will finish posting the tutorial then. Hee Hee It is too much fun. Can you see the Kindergarten excitement on her face!
I finished uploading all the photos but have to run out the door to work for a couple of hours. I will finish posting the tutorial then. Hee Hee It is too much fun. Can you see the Kindergarten excitement on her face!
******************************************************************************
Ok I am Back from work now and can post away. If you couldn't tell, the Apron for August is a paint smock. This is a pattern my mom made almost 30 years ago when my little brother Jonny went to Kindergarten. I was so jealous and thought it was the coolest thing ever. I loved the fabric border.
On with the tute....
Supplies:
1 yard heavy fabric (denim, canvas or a heavy twill)
narrow double fold bias binding
3/4" elastic
Thread
1. Cut out your fabric 42" by 30" (or the width of the fabric by 30")
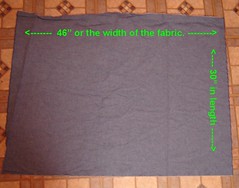
(yes I know the photo say 46" that is ok too.)
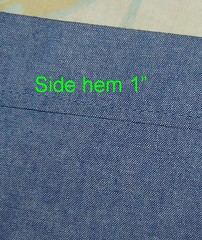
2. Hem up the sides first you can make this any measurement just fold it under at least 1/2" and then again so that the finished width of the smock is about 38 to 40 inches.
3. Now you need to hem the top and bottom. The top is very important. This is the casing for the neck elastic. I folded mine down 1/2" inch and pressed it very hard.
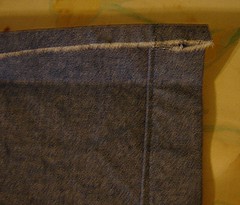
Then I folded in under 1" to 1 1/4". I also pressed this very hard with the iron. This really helped when I went to sew such heavy fabric. Top stitch this casing.
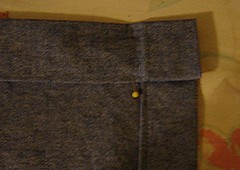
Hem up the bottom in a similar fashion so that the finished length of the smock is about 25".
4. Now you are ready to make the arm holes.
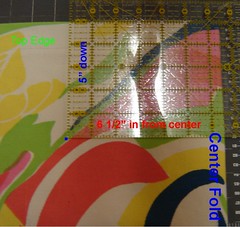
Fold the smock in half from side to side. Measure down from the top 5" and in from the center fold, 6 1/2". Make a little mark. Measure over from this dot about 5 1/2" inches (away from the center fold and also 5" down from the top). These are the two ending marks for the arm hole curve.
Now here comes in the technical tool time. Hee Hee. Get a largish cereal bowl. I use a glass bowl I found. 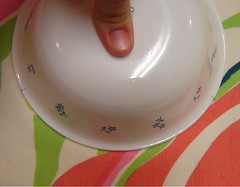
Connect the dots on the smock with the curve of the bowl and use a rotary cutter to cut the curve (or draw it with a pencil and cut with scissors). Make sure you go through both layers.
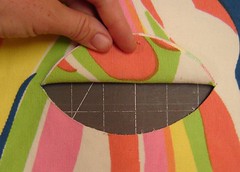
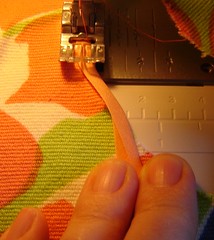
Now bind off the arm holes with the narrow bias binding tape. I just started in the center of the bottom of the hole and used a zig zag stitch to secure it. It was a little tricky at the corners but if you go slow it is ok.
Oops! I almost for got the elastic. Cut a piece of 3/4" elastic, 19"long. Thread it through the casing at the top. Secure the ends by overlaping and tacking down with thread.
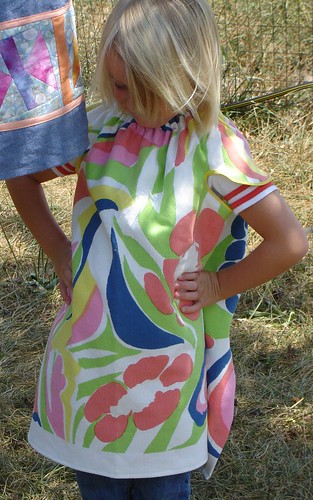
Now you are done!!
Too Cute!
****************************************************************
Now for personalizing your own Smock.
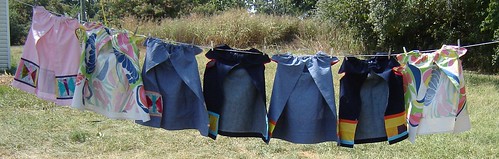
On the original smock there was a pieced border. Of course I had to do the same. I took scraps of my hand dyed fabrics and made some smocking funnesss. One of these is for Hannah, One for Ana and the rest are going into my etsy and hyena cart stores. If you are interested take a look!
Here is the parade of Smocks

The backs of the smocks. It was too fun not to post.


22 comments:
Very nice tutorial. Cool aprons. :}
I LOVE IT!!!
Have you done one of these for adults? I'm looking for a good smock to wear to work. Would it look totally dorky on an adult body? I guess I'll just have to try--but I'm wondering about the armholes. Any suggestions for the size?
I think this would look ok on an adult, You would really have to modify the arm position though. I just tried one on (and NO I won't take a picture too dorky). You need bigger arm hols, maybe a plate would do it. and they need to be a big further from the center and and a bit lower from the top. Does that make sense? I have seen smocks like this on adults before.
Some of those are too pretty to be used for painting in, maybe helping with the cooking.
I have a question. Could you surge the edge of the top and bottom and then turn the hem just once so there isn't so much bulk at the hem?
Yes you could just surge the edge. I was following mom's original pattern and she did the folding with very heavy fabric and it wasn't bulky. I think I did it the other way on one because there wasn't enough fabric to do extra folding.
This is a very cool apron pattern, so clever!
Thanks for the tutorial.
I know what I'll be making this weekend!
I found this and had a great opportunity to make it. My youngest was headed to Kindergarten and needed a painting smock. You can see mine here: http://jobthedog.blogspot.com/2008/09/smock-or-frock.html
Thanks for the tutorial! It was great and my other three girls all want one.
I made one for my 4 y.o. daughter for preschool. I made it using cotton quilting fabric with ladybugs on it. It was a great afternoon project and very cute! I'm going to make some more for birthday gifts. Thanks for the tutorial.
Thank you. I am glad you enjoyed it and were able to use it. It makes me happy to think of other little children enjoying my mother's paint smock pattern.
Hi - I love this idea. I'm planning to make them for all of my grandchildren - seven ages 6 and under. My question is this - do you put velcro/snap/button or something at the top of the back to hold it together?
Karen - No it doesn't have a snap or anything like that. The elastic is in a loop and that is what holds it shut, allowing for ease to get over the kids head. I should have taken a picture of that. I still might and get it posted here.
Lucy?? Cannot believe it, I was given a similar smock made by a kind relative about 35 or 40 years ago, when one of my boys started pre-school. It was made from a red cotton seersucker fabric with little animals on it.
Now I need to make two of them for my two little grandchildren, a little girl who is 2-1/2 and a dear little 18 month old boy, brother and sister. I get to mind them when mummy goes to work a couple of days a week.
I have bought the paints but need to make the smocks before I bring out the paints. I thought I might try to buy some plastic coated fabric, as the smocks could then be wiped down after each use.
Some things never change do they?
Thanks for the pattern!!!!
Maryanne
Thanks for sharing!
Just completed one for my 7 year old daughter who needs a painting smock for school. She LOVES it - and says it looks like a dress! Had to modify the sleeve position a touch, but it worked out well. Thank you so much for the tutorial - it was simple, yet stylish. Just what I was looking for. :)
just finished whipping one of these up for my daughter for school. I made it from her old Kinndergarten sheets so it is both practical, pretty and nostalgic of her Kindy days. She loves it! And it was so easy to make. Love it! Thankyou so much :)
I am dying to make this but I just particularly don't understand the term: "Make a little mark measure over from this dot about 5 1/2" inches (also 5" down from the top). These are the two ending marks for the arm hole curve."
I don't understand where the dots are meant to go. I get where the first arm hole dot goes but after that I am lost!! Help!
Suzie Q, I just edited the posting. After you make the first dot, measure over from it 5 1/2" toward the side seams. Make your second dot (be sure to keep that dot 5" down from the top edge to keep it even with the first dot. Now you have a starting and stopping point to make your arm hole. I hope that is clearer.
Thankyou Lucy, I get it now! the added info about measuring toward the side seams really helped. Can't wait to get cracking.
I love your aprons! I'm new to sewing so this will be perfect as a beginner project. Thank you sooooo much for the tutorial! =)
Post a Comment