


I have had this apron in my head for a long time and really wanted to make it. I saw a picture of one in the Apron Book and just loved the idea. So I thought about dimensions and drew up a pattern. I would show that but Jeddie did some art work on it yesterday and tore it to shreds. I will have to make another one now but didn't want that to delay this posting any longer.
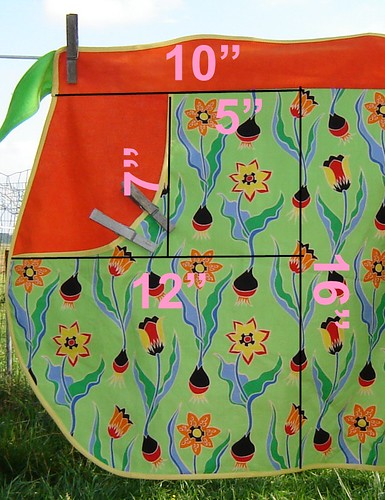
Here are the dimensions of the pattern pieces so you can make your own.
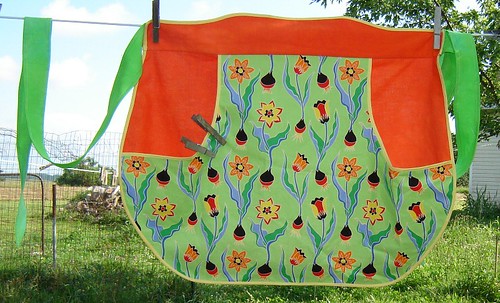
The apron skirt is made of 2 pieces, a front and a back. The whole apron is a pocket.
To make the pattern, the dimensions are for half the apron (as you would place it on the fold).
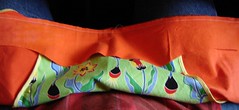
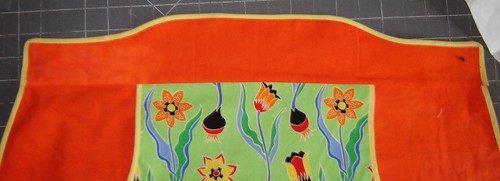
The apron skirt is 16" tall, 10" wide at the top, and 12" wide at the widest point.
The front, or pocket, is the same size as the back and has the pocket holes cut out of it. To make the pocket holes, measure out 5" from the center and draw a vertical line. Now measure down 7" from the top and draw a line. This is your cut out area. I curved mine using a bowl or plate as a template.
The waist band is 3 1/4" tall in the center and 2 1/4" tall at the ends. I made a curve near the middle of that just for looks. You can do this any way you wish. The waist band should be 10 1/2" long. (I forgot to add the 1/2" and had some troubles fitting it on.)
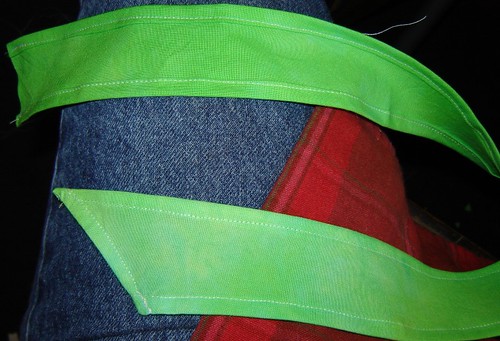
The apron strings were cut with the rotary cutter. I cut them 3" by the width of the fabric. I cut one end at a 45 deg. angle for looks. (I thought this would be wide enough to gather at the waist band but it just fit. I would make the next one wider 4-5" maybe.)
Fabric Needs- (this is a great way to showcase a novelty fabric!)
½ yd of theme fabric
½ yd of backing fabric
¼ yd contrasting fabric for the ties and waistband (use some scraps you love)
Double fold bias tape
Cutting Instructions
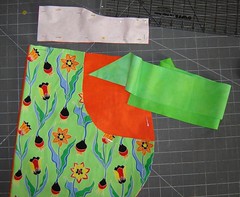
Cut one front pocket piece on the fold
Cut one back piece on the fold
Cut 2 waist band pieces (you can make this sturdier by also cutting an inner lining out of pellon or some such stuff)
Cut 2 ties (3”X the width of your fabric)
Sewing instructions:
1. Sew the bias binding along the curves of your pockets.
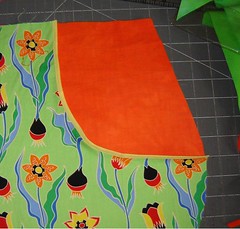
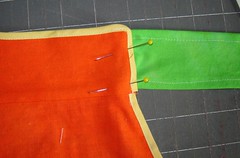
2. Sew the bias binding along the outside edge of the apron with front and back pinned together. It really helps to pin the front down all over the place to keep it from shifting.
3. Pin the waist bands to the apron top. One in front and one in back, right sides together. They should overlap ½ ” on each side. Fold this overlap in so the waistband is flush with the top of the apron skirt. (remember I forgot to add the ½” on each side so mine won’t show this.) Sew a quart inch seam. Fold the waist band up and press.
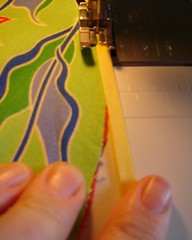
4. Trim the top of the waist band with bias tape. Sew in place.
5. Fold the ends of the waist band to the inside ½”.
6. Fold down the edges of the apron ties ¼” and then again ¼” and press. Top stitch. Be sure to leave the strait short end plain.
7. To attach the apron strings, insert them into the waistband on the ends that are folded in. Gather the strings as needed to fit them in. Pin them in place and top stitch to secure them inside. (remember that I made mine wrong so I had to attach them from the back.)
Now you are done!! This was so fast and easy (for me). I hope my instructions were clear enough.
I haven't made any extras yet. If I do I will put them in my Etsy account.


27 comments:
Great tutorial! I never thought of making an apron that was just one big pocket. :)
Well I thought I would only use it for laundry but I LOVE IT! It isn't too long for me so I can reach the bottom of it easily. It is perfect for crafting when you need things accecible but not out on the table. It is also great for cleaning when you have a few stray objects that need to make their way home and can take a ride in an ample pocket.
I LOVE the fabric! I can't wait to try it! I have been looking for a good camp apron! Maybe this will be it??
ps. 9 days until the reunion!!! **squeal**
I must try this one.
I LOVE this apron. I'm a beginning sewer, but this tutorial was so easy to follow. Thanks!
Some of my favoriate childhood memories are of my Granny in the kitchen making biscuits in her apron. For her, it was part of getting dressed each day.
Kelly
Thank you! This is my favorite apron in a book I just got ("A is for Apron") but all of the patterns need to be enlarged 400% - and I'm just not getting to the copy center right now. With your tutorial, I don't need to.
Thank you! I am so happy to hear about people making aprons from my tutorials. I would love to see it!
love it!!! Thanks for the instructions. :)
I'm a beginner sewer and trying to make this apron... I am confused about the dimensions in your photo. The top measurement of 5" is only to the half-fold, correct? So the 16" in the middle... is that to the half-fold too, or all the way across? It doesn't seem possible from the photo that the apron is 10" wide at the top, and 32" in the middle?? Or maybe I am confused... please help :/ I've cut out pieces but it looks much skinner than your beautiful apron :(
Nevermind, I'm an idiot! :/
Thank you for this tutorial! I'm really new to sewing and more so to aprons, but I'm excitedly making this for my sister for Christmas. :)
For some reason, it didn't occur to me that I should choose a solid for the back fabric...so my fabric has front and a back. I'm adding another layer on the back of the apron for a finished look and I hope that my first experience with bias tape edging goes well with three layers of fabric inside.
Any tips??
Wish me luck! :)
Whitney
Made similiar apron years ago. Still use it even though it is well worn. I put a loop on the waistband of mine for hanging it up when I go inside with it. For me, I also divided the large pocket in half, top to bottom so that I can separate the clothespins....spring from push on.
Thank you for this pattern and great instruction! I look forward to trying it out. Also, I love your music playlist- so great!
Thank you. I love that music too.
I will have to try sewing the pocket in half. That would very handy at times.
Thanks for the great tutorial! Here's my finished apron. I love it!
http://naturallychicmama.blogspot.com/2010/07/clothespin-apron.html
i can't wait to try your tutorial. but the pocket was so big, lolz. but it's cute.
Thankyou! Exactly what I have been looking for!
I made this apron for my mom who hangs her laundry out as soon as it is warm enough. . . she absolutely loves it!!! Thank you for the great tutorial.
Oh goody. I'm off to see if I have enough fabric to make myself one of these. My peg basket has been annoying me for the longest time.
WOW, this is the 1st thing I ever tried to sew that was more complicated than straight lines and it turned out FANTASTIC, your instructions on how to make a pattern and assemble it were great! I cant wait to make more for friends and family! ♥x♥x♥ Amielou
Amielou!!! That makes my day! I am so glad that worked for you and that the instructions were clearer than Mud... I wonder sometimes when I am typing them up if... anyone else can understand my ramblings... ☺
I have been trying to buy a clothespin apron for a couple of years. I was very happy to find this pattern.
This is so wonderful,thank you very much for this lovely idea,keep up the good work, wish you all the best
This would also make a great garden apron to gather your harvest in.
I am so excited to find your free pattern and tutorial to make this apron. It's much better than a bag you have to slide along on the clothesline.
Thank you!!!!
Great tutorial. I loved making my apron very easy to follow.
I will gather eggs in mine.
Post a Comment