home tutorials recipes aprons/patterns Soaps

Sunday, June 24, 2007

June -- Clothspin Apron

June has been just the busiest of months. All 4 of the big kids are in summer school so I should have tons of time on my hands. However, I have to work more hours at the health dept and I decided to teach 4 after school classes this summer. Soooooo ...., my time is just gone. Also my FIL is getting re-married today and has sent all of my MIL's things here this past week and I am up to my eyeballs trying to sort through it and return my home to some kind of normal before the family reunion next week.
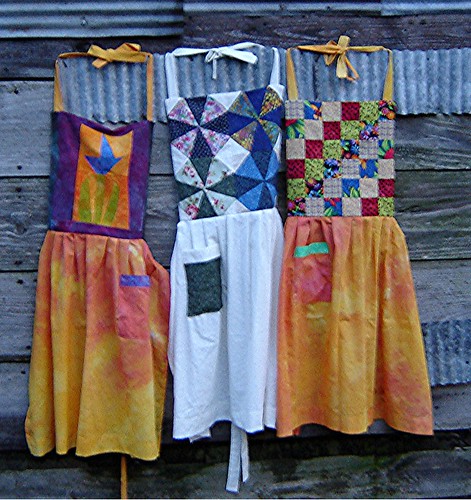
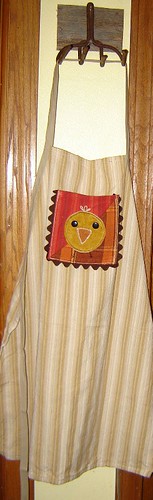
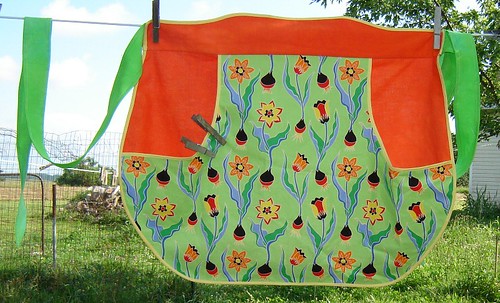
I have had this apron in my head for a long time and really wanted to make it. I saw a picture of one in the Apron Book and just loved the idea. So I thought about dimensions and drew up a pattern. I would show that but Jeddie did some art work on it yesterday and tore it to shreds. I will have to make another one now but didn't want that to delay this posting any longer.
Here are the dimensions of the pattern pieces so you can make your own.
June Apron10
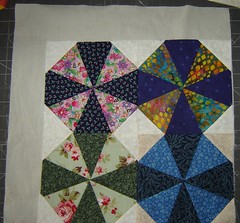
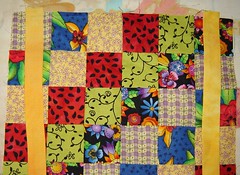
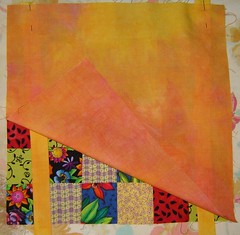
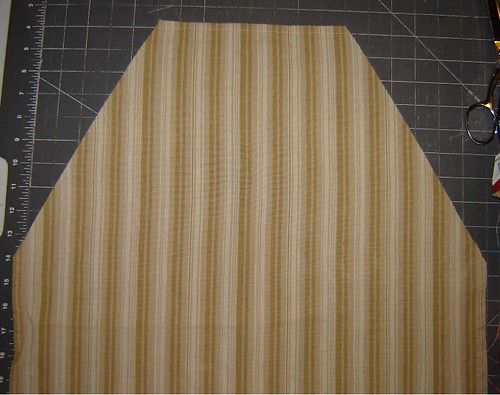
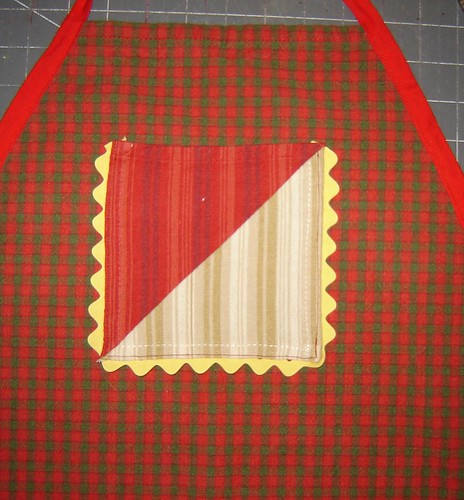
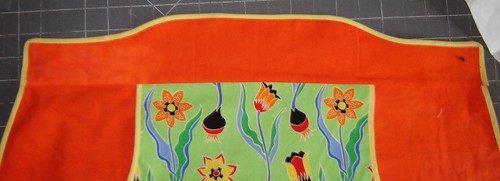
The apron skirt is made of 2 pieces, a front and a back. The whole apron is a pocket.
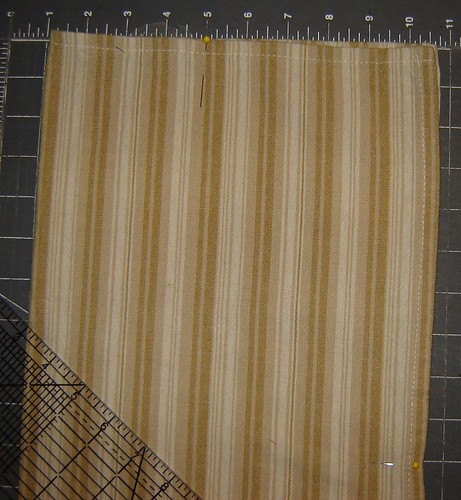
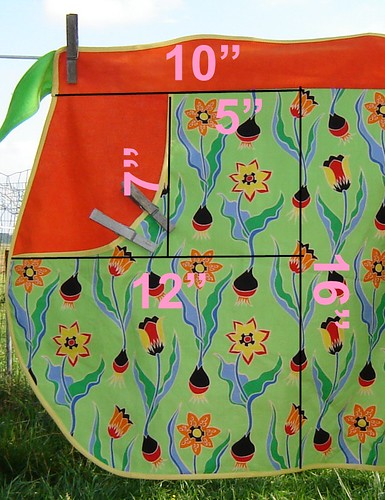
To make the pattern, the dimensions are for half the apron (as you would place it on the fold).
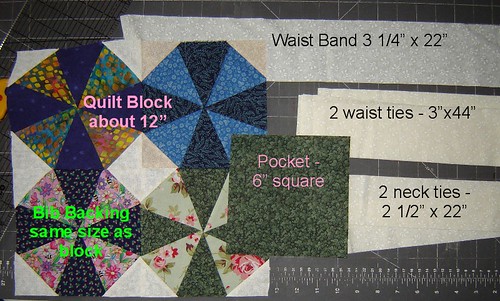
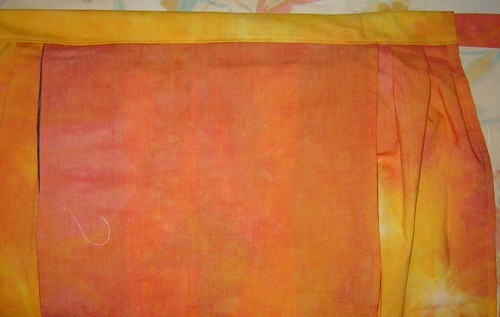
The apron skirt is 16" tall, 10" wide at the top, and 12" wide at the widest point.
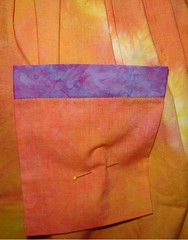
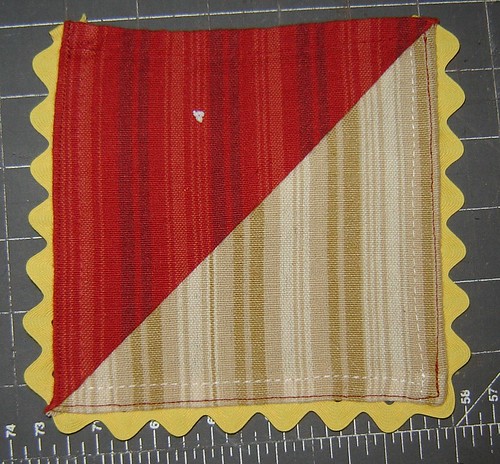
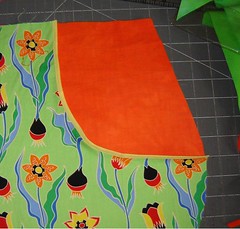
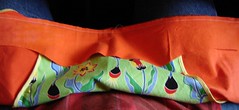
The front, or pocket, is the same size as the back and has the pocket holes cut out of it. To make the pocket holes, measure out 5" from the center and draw a vertical line. Now measure down 7" from the top and draw a line. This is your cut out area. I curved mine using a bowl or plate as a template.
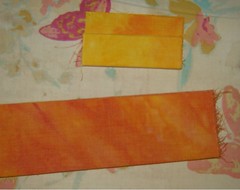
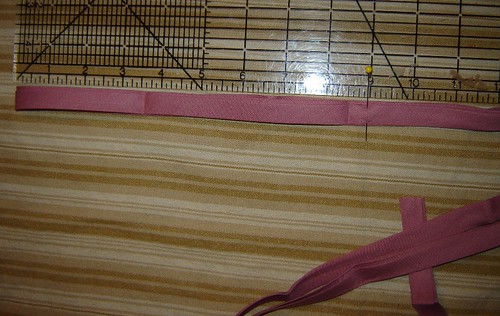
The waist band is 3 1/4" tall in the center and 2 1/4" tall at the ends. I made a curve near the middle of that just for looks. You can do this any way you wish. The waist band should be 10 1/2" long. (I forgot to add the 1/2" and had some troubles fitting it on.)
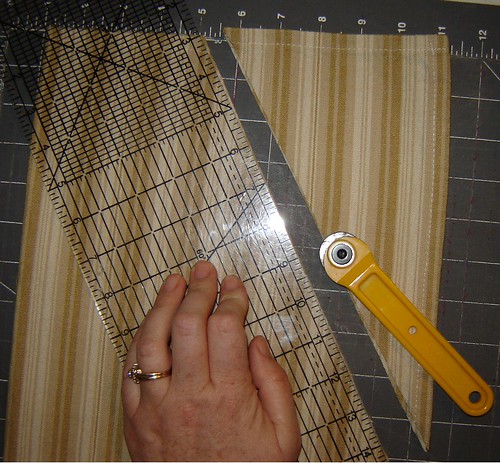
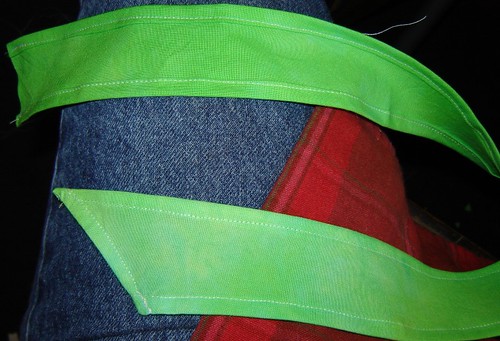
The apron strings were cut with the rotary cutter. I cut them 3" by the width of the fabric. I cut one end at a 45 deg. angle for looks. (I thought this would be wide enough to gather at the waist band but it just fit. I would make the next one wider 4-5" maybe.)


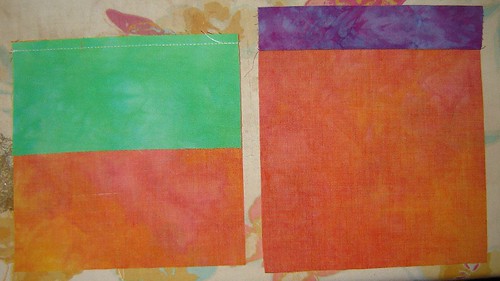
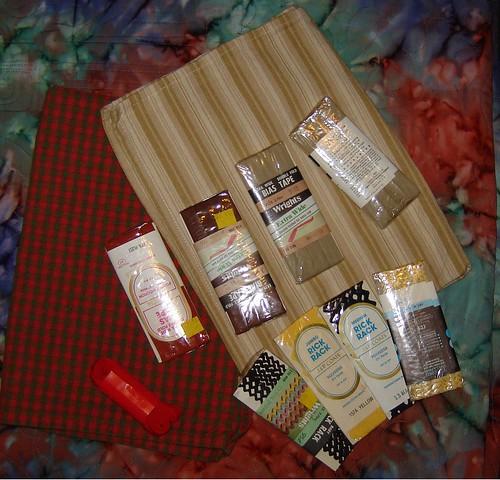
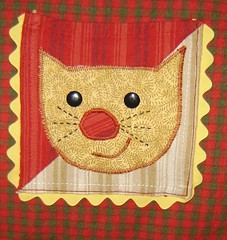
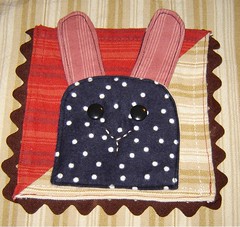
Fabric Needs- (this is a great way to showcase a novelty fabric!)
½ yd of theme fabric
½ yd of backing fabric
¼ yd contrasting fabric for the ties and waistband (use some scraps you love)
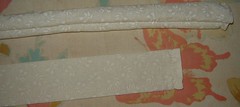
Double fold bias tape

June Apron 1
Cutting Instructions
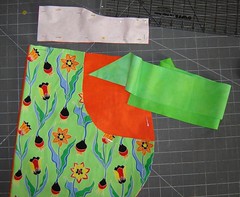
Cut one front pocket piece on the fold
Cut one back piece on the fold
Cut 2 waist band pieces (you can make this sturdier by also cutting an inner lining out of pellon or some such stuff)
Cut 2 ties (3”X the width of your fabric)


Sewing instructions:
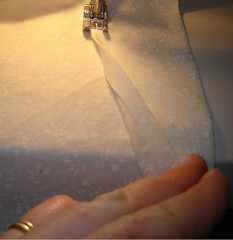
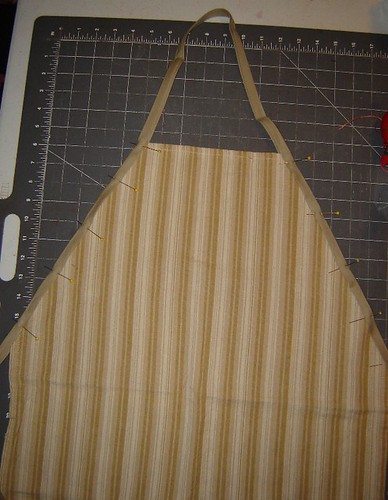
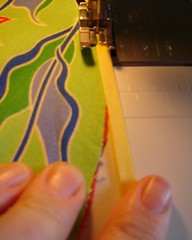
1. Sew the bias binding along the curves of your pockets.
June Apron 2


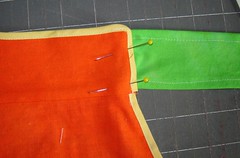
2. Sew the bias binding along the outside edge of the apron with front and back pinned together. It really helps to pin the front down all over the place to keep it from shifting.
June Apron 3


3. Pin the waist bands to the apron top. One in front and one in back, right sides together. They should overlap ½ ” on each side. Fold this overlap in so the waistband is flush with the top of the apron skirt. (remember I forgot to add the ½” on each side so mine won’t show this.) Sew a quart inch seam. Fold the waist band up and press.
June Apron 4


4. Trim the top of the waist band with bias tape. Sew in place.
5. Fold the ends of the waist band to the inside ½”.
June Apron 6


6. Fold down the edges of the apron ties ¼” and then again ¼” and press. Top stitch. Be sure to leave the strait short end plain.
June Apron 5


7. To attach the apron strings, insert them into the waistband on the ends that are folded in. Gather the strings as needed to fit them in. Pin them in place and top stitch to secure them inside. (remember that I made mine wrong so I had to attach them from the back.)
June Apron 7

Now you are done!! This was so fast and easy (for me). I hope my instructions were clear enough.
June Apron 9
I haven't made any extras yet. If I do I will put them in my Etsy account.

Monday, May 21, 2007

The Winners

I know I was supposed to post this yesterday but I was just too sick to remember to post.

Here are the winners of the two Quilt Blocks

Block #1
MA 3
... goes to ..... kaathy

Block #2
MA 2
... goes to .... bethany

E-mail me and I will get these blocks off to you.

Saturday, May 19, 2007

Pork Tacos

Taco
I have to share this recipe with you. My sister, Mary, shared this with our family and I had to give it a try. She calls it Cuban Pork Roast. It is so full of flavor and not too salty. I like that.
For my Tacos, I use only plain corn tortillas. They are so much better for you than the wheat flour ones. I opt for the plain tortillas over fried shells too for health reasons.
What I do is take the corn tortillas and heat them in a cast iron pan (that has NO oil in it). This will soften up the tortillas so they don't just break on you.
Then we layer on the goodies we like,
And they are:
Pork Roast
green onions
chopped tomatoes
cheese
avocados
etc.

Here is the Pork Recipe:
2 to 3 pound boneless pork roast
1 Tablespoon minced garlic (I use 3+ Cloves)
2 Tablespoons minced parsley
1 Tablespoon paprika
2 teaspoons ground cumin
1/2 teaspoon black pepper
1 teaspoon salt
2 Tablespoons lime juice
2 Tablespoons honey
2 Tablespoons olive oil

Directions:
Mix all together except the pork. Rub the mixture over all surfaces of the pork. Cover well, and refrigerate for 6 to 24 hours.
Roast the pork in the oven at 425 degrees for 30 to 40 minutes. (that seems a little short to me)
My sister (and I did too) put it into the crock pot and cooked in for 10 hours on low.
I then took it out of the pot and shredded it with a fork.

Chopped tomatoes:
Chop up Roma tomatoes
Add some chopped fresh Basil
Add a pinch of salt
Let it set for a couple of minutes to bring all the flavors together. This gave a really nice kick to the tomatoes.

Wednesday, May 16, 2007

Spring Craftiness

My girls and I had a crafting fix this week. I just have to post the fun things we made.
Sarah came to me and begged me to teach her how to make a Not So Sock Monkey. She loved little Ivan and wanted one she could have (sorry Ivan is mine). So I worked out the pattern for her and she did 99% of it by herself. I was very pleased with her work. Sarah is 9 now.
Well Hannah was so excited about what Sarah was doing so she begged me to let her make one too. I did and she did 75% of it all by herself. Keep in mind that Hannah is 4.
Here are their Monkey Sisters.
Monkey Sisters
Here are their little curly tails.
Monkey sisters 2
Caroline started a monkey too but got tired of waiting for help and went off to play. She did make this for me this spring so I figured I would share it with you. I just love it. It is so like her.
Caroline
Well I got bitten by the Crafty bug and had to make this little doll. Her name is Alice.
Alice 1
Oops.

Alice 2
She is just too cute. I had a Raggedy Anne Doll when I was really little that one of my sisters made. I don't know what happened to it. I have always wanted another one. Now I have one.
I bought the pattern from Christine Zorn's Etsy Store HERE. She sells the pattern and finished dolls. I love the dolls with petals. You can also get her dolls at her Ebay store HERE.
Go check them out.

Thursday, May 10, 2007

May Apron Tutorial - Quilt Block Apron

MA 19
I have really been debating what to do this month. There were several options and I decided to go with this in the end. In our quilt guild my niece, Rebecca, has issued a challenge to get rid of your UFO's (unfinished objects). So I decided to make a pattern for an apron that can use up stray quilt blocks. The blocks in these 3 aprons are all from my UFO stash. The first block is a flower done in Cave Man Quilting style that I learned from watching Ricky Tims over a year ago. It has been kicking around my sewing room just waiting for a project. The second apron is a left over block from winning the Block of the month drawing in my Quilt Guild, the Newtonia Battlefield Quilters Guild. The third block is one from a pattern my mom introduced to the guild over a year ago called Scrappy Around the World Block. I love that block and it just needed a project. Also in keeping with the theme of recycling or finishing. The orange skirts are part of a very old project. I hand dyed a sheet a while back and used some of it for a project. I saved the hemmed ends of the sheet and used them for the skirt of the apron because they were already hemmed. This apron pattern came from the first apron my mother gave me a long time ago. It is now falling apart and I wanted to preserve the pattern and keep it in memory.
Well...... on to the Tute.....
Fabric Requirements:
MA 1
2 Neck ties - 2 2/5" x 22" (or half the width of your fabric from salvage to salvage)
2 Waist ties - 3" x 44" (or the width of your fabric from salvage to salvage)
1 Waist Band - 3 1/4" x 22" (half the width of the fabric)
1 Skirt - 25" x 44" (the width of your fabric)
1 quilt block (about 12" remember that an unfinished quilt block will measure 1/2" wider than the finished block will be)
1 Bib back - cut the exact same size as the quilt block
Always use 1/4" seam allowance
1- Make yourself a quilt block. There are tons of free on-line quilt block patterns to choose from. My favorite place to go is Marcia Hohn's Quilter's Cache. If you like the Tulip I have up in Apron 1 you can get the instructions from Ricky Tims.
OR.... if you are lucky enough to inherit one or get one at a flea market, Use it.
***NOTE*** If you get a block and it is stained, do NOT wash unfinished. Finish the project you are making with it and then wash it.
A good size for a block is about 12". If the block you have chosen isn't 12", you can add boarders to the sides as needed.

2. Cut a backing piece for your bib the exact size of your quilt block.
MA 4

3. Now make your neck and waist ties. Fold your ties in half lengthwise. Stitch along the long side and one end.
MA 8
Clip corners, turn right side out and press the ties. I use a long chop stick to turn skinny things like ties and doll arms.
MA 9

4. Attach the neck ties. Place the neck ties at the top of your quilt block right side up. Place them where you would like them. I like them at the outside corners. Remember to place them at least 1/2" in from each side to leave space fro the seam allowance. You don't want to sew them into the side of your bib.
MA 5 MA 6
Now place the bib back piece on top of this with right sides together. Stitch around the sides and top of the bib. Leave the bottom open. Clip the corners and turn it right side out and press.

5. The Skirt. Hem the bottom of the apron skirt and the sides. I do this by folding the bottom edge down 1/4" and pressing it. I then turn it under again about 1-2" and press again. I top stitch the edge to finish the bottom hem.
MA 7
For the sides I fold them in 1/4" and then fold them in again and stitch it down.

6. Gather the skirt. To draw the skirt in to fit the waist band you can gather it or pleat it. To gather it, run 2 parallel rows of stitching across the top of the apron. then gather it in to fit the waist band OR... you can pleat it. I cheated on this. I took the waistband and the skirt and folded them into 16ths and pressed them really well with the iron. (if you do this make sure that you leave room for the seam allowance on the waist band part. I hope you can see that in the photo.
MA 10
Now to pleat the skirt. Take the bib and place the back of the bib on the face of the apron. Center it in place a pin it there. Now take the skirt and match up the fold marks with those of the waist band. In them in place where the folds are. Now flatten your pleats in what ever direction makes you happy. (make sure that you put the apron and bib right sides together.
MA 12
Sew the bib, band, and skirt together.
Now on the top edge of the waist band, fold it under 1/4" and press. Fold the band over, right sides together and press. Now slip the apron ties into the band and pin in place. I know that my wording is confusing but look at the photo. I hope it makes sense.
MA 13
Stitch each end of the band, clip corners, turn and press. Top stitch the bottom of the band to close it or you can hand whip stitch it together.
MA 14

7. Place the pocket. Now put the apron on and tie it in place. Put your hand on the apron where you would like the pocket and pin the pocket in place.
MA 16 MA 17
Oops we need to make the pocket. Take your 6" square and the accent band and place them right sides together and sew them along the top. Fold the seam open and press.
Now take the top edge of the accent piece and fold it under 1/4" and press. Fold the piece in half and stitch in place.
MA 15
Now go and pin it where you like it and stitch it in place. Remember to re-enforce the tops of the pocket to keep it from ripping off.

NOW you are done.
MA 18
This is my mom wearing her new Mother's Day Apron. :o) I have to say it is my favorite.

Now I have 2 extra quilt blocks that need a home.
MA 3 MA 2
I would like to give them to 2 of you. So, I will do a drawing of the names of people that add a comment on this post. I your comment I would like you to share something quick about your earliest Apron Memory. (a quick description, who wore it or something like that). I will put the names of all the commenter into a hat and draw out 2 of them next Sunday (May 20th).

Saturday, May 05, 2007

Twirly Whirly Tie Dye Dresses

All 1 I did tie dye this week. I love to tie dye. I made up these 15 little dresses (12 mos to 4T) for fun this week. Kara asked me to make 2 new ones for my niece Emily because she wore her other one out. I also needed to make one for baby Claire so I just had fun making a bunch to choose from.
I considered doing a tutorial for these but that is really complicated and I just didn't have time this week. I also had to dye fabric for and sew up a quilt top to display at a local quilt store for a class I will be teaching there. If anyone is in the area and is interested, I am teaching Low Immersion Dying at The Country Store on I 44-Exit 18A- Outer Road West Carthage, Missouri.
The Class is $45 and that includes 10 fat quarters of fabric that you will dye in 10 colors, all the supplies, and a fun lesson in dyeing. If you are interested, e-mail me.
Enough of that !!
Here are some more pictures of the dresses.
D 1 D 4a D 5a
These are some of my favorites.
G 6
I can send you to the instructions I used to make these. I have made these in the past but this time I followed Rowena's instructions.
The dyeing is my own thing. I have been tie dyeing for about 20 years now and have come up with this method based on many trials and experiments. The colors in these dresses are bright but softened in the lines. To me it is an impression of little girls. The colors are almost dancing and twirling on their own.
I have put some of the dresses in my Etsy Shop. If you want to see more of them, go take a look.

Saturday, April 28, 2007

Donut

Donut
I was craving some sugar yesterday and had to have a donut. Thank heaven Daylight Donuts and Krispy Kreme are too far away. Soooooo..... I made my own donut. I have wanted a donut pincushion for a long time. Now I have one! It was so fun and fast to make.
I will not post a tutorial as there is a much better one here. I will let the experts Tute you on this one.

Wednesday, April 25, 2007

Sesame Noodles

Sesame noodles
(note the awesome bowl!! Miss Caroline made that for me in pottery class this spring)

I think this is my favorite noodle dish. Bryan has been asking me to make it almost everyday. Today I had to make it to end my NO salt fast. I had to have some tests done and couldn't eat salt for 4 days. I didn't know how much I loved the stuff.
Here is the recipe
Sesame Noodles
4 Tbsp peanut butter (I like it with crunchy)
4 Tbsp soy sauce
Pinch cayenne pepper
3 Tbsp vegetable oil
1 Tbsp toasted sesame oil
1 pound cooked pasta, drained and cooled (I don't salt the water as this dressing is so salty)
3 Tbsp toasted sesame seeds
4 green onions chopped
Whisk peanut butter, soy sauce, cayenne, oil and sesame oil. Add the noodles and toss to coat. Sprinkle with sesame seeds and green onions to garnish.

Friday, April 20, 2007

SOAP SALE

It has been a miserable and pathetic Spring here in the Ozarks. First we had that terrible ice storm that broke most of the trees here. Then we had a terrible deep freeze the first week of April that killed off everything but the weeds. We lost our whole grape crop too. This was a big bummer because I had worked so hard in pruning and trellising them. Things are just a little glum here and to very spring like.
To cheer things up, I am offering a Spring Soap Sale at http://www.freewebs.com/mamabyrd12/ if you are interested in a great deal on soap, go check it out.
Pine Tree
Lye soap is good for so many things. Here is a list of my favorites (or at least the ones I can think of off the top of my head):
-The natural pH of lye soap removes the dirt from your skin without removing the essential skin oils thus leaving your skin soft.
-The pH of the lye soap also in naturally anti-bacterial and helps keep your hands germ free longer and without the harmful chemicals of anti-bacterial liquid soaps.
-The hand made lye soap has all its original glycerin which helps keep your skin soft.
-Lye soap is offensive to Ticks and Chiggers (if you don't know what that is your are very lucky!!) Washing with it helps keep them off longer. Using it after being bitten also helps you heal up faster.
- Lye soap is a must for people with Poison Ivy problems. If you are exposed to poison ivy, washing yourself off with lye soap in cool water will help prevent an outbreak. If do have an outbreak, washing with lye soap (especially the oatmeal scratchy kinds) will help you heal up faster. (how do we know this?? Bryan has a major allergy to poison ivy and cedar trees and this is what he uses now and hasn't had to have the shots for years).
-Lye soap is great for your complexion.
- because of its moisturizing properties, it makes a great shaving soap for legs and faces.
- Lye soap is very mild on your skin and is great for people with sensitive skin. I have a couple of kinds that are especially designed for that.

I could go on and on and on...... I love lye soap and what it does for you. It is another way of going back to natural things for your body.
If you've never tried it, give it a try. You will love it!!

Monday, April 16, 2007

Lucy Needs .....

Angelic has this on her blog and it is too funny! What you do is type your name with "needs" after it in Google and see what Google says you "need"!
Lucy needs ....
1. gosip! (tell me your juice!)
2. a haircut (too funny as my hair is about 3 feet long)
3. ... your love. (a springer spanial in need of a new home) :o)
4. ... professional help ( you have no idea how badly!)
5. ...Lucy needs to realize that there is no way you can make your parents be what you need. They either are or they are not. (hmmmm interesting)
6. Lucy needs to assess what things she likes doing most. ( true but hard since there are so many things I like to do most)
7. Lucy needs another animal like her as a companion (I think this is my favorite!)
8. Friends and family from Coast to Coast are aware that Lucy needs Butt Support. (well!)
9. Lucy needs a turban and a crystal ball. And a ruby in her navel! (don't we all?!)
10. Lucy needs to be an only cat not only because she is declawed but also because she does tend to get a little upset if she isn’t the center of attention. (there you go)

This was too much fun. Thanks Angelic.
Now you go out and do it. Make sure you go pee first though!
Good Night!

Tuesday, April 10, 2007

April Apron Tutorial

Can you believe it! I have an apron pattern before the end of the month. How amazing!
AA 1
This one is so easy. It is another Dishtowel Apron.
You will need:
AA 2
1 Dishtowel (washed and dried before starting, these shrink a lot and you don't want to distort your apron)
1 package double fold bias tape (2 1/2 to 3 yards)
Ric Rac (the requirement for the March/April Tie-On Challenge)
Fabric scraps for the pocket

1. Fold your apron in half lengthwise.

2. Starting at the top of your apron measure 4 inches and mark it. From the top corner measure down 10 inches (this is the non-fold side).
AA 3

3. Now, using a rotary cutter and ruler cut from the 4" to the 10" marks, making a triangle.
AA 4

4. Now un-fold your apron and lay it out.
AA 5

5. Now take the bias tape and fold it in half to mark the center. Measure down 9 inches from the center on each side. This will be the neck of your apron.
AA 6

6. Now pin the bias tape to the apron. The pins at the 9" marks should line up right at the top of the apron. Open the bias tape and sandwich the apron inside.
AA 7

7. Sew the Bias tape close to the edge (top-stitch) starting at one end of the tape and sewing all the way to the other end.
AA 8

8. Now take the left over triangles and any scrap fabrics you have a make a pocket. I made several aprons so I mixed and matched the scraps and made half square triangle units for pocket patches.
AA 9

9. Now comes the token Ric Rac. Place the edge of the ric-rac under the edge of the pocket and top stitch in place.
AA 10

10. Place the pocket on your apron and pin in place and titch it down and you are done.
AA 11

OR ......
You can add and applique to the pocket before you stitch it down. Here are some that I did.
AA 12 AA 13 AA 14 AA 15 AA 16 AA 17 AA 18
I made an extra for a friend and Vea is the lucky winner. She took hers home to embellish it herself. I can't wait to see what she did.
I also made two for my Etsy store. You can check them out there.
Related Posts Plugin for WordPress, Blogger...